How To Hide Your Laundry Pile Up In A Pinch!

Ever wonder “How To Hide Your Laundry Pile Up In A Pinch?“

Maybe you are thinking, why wouldn’t I just wash it? Yes, that’s ideal! But… I think we all have had that moment when it just got OUT OF CONTROL and,just so happen, company is due to arrive soon. Now what?

How My Tip Was Born..

My tip for hiding your dirty laundry in a pinch was first thought of as I stared

at a overflowing pile of clothes in the floor. I couldn’t stand it another minute but unfortunately, with my tiny RV washer, tossing a load in would not even put a dent in the overwhelming sight.

I considered tossing the pile into the shower and shutting the door but we needed showers… the extra bed, laundry room, bedroom, or basement, in my case, wasn’t a option. My mind went to my mom’s tales of her dad folding and hanging all of his dirty clothes due to his neatness. We always laughed at her memories of sniffing pappaw’s clothing to see what needed washed.

With A Little Change..

No worries! I never planned on hanging up dirty clothing in the closet 😂 but it did get me thinking…

The way we fold & hang clothing obviously makes a difference in space. If it didn’t, we wouldn’t spend so much time choosing the perfect way to organize our dresser drawers and suitcases and there wouldn’t be the ultimate rolling or folding debate. No matter if you are a folder or a roller, we can all agree that “wadding” up our clothes and stuffing them into our drawers or suitcases is NOT the space saving solution, therefore it would automatically NOT be a good hiding solution on either!

Now For The Actual Tip!

Dump your laundry basket of clothes out. (That’s right!). If they are already in the floor, then you are ahead of the game lol.

Quickly sort the clothing into your washing categories. (Might as well take advantage of the process)

Now lightly and quickly fold each large item before placing it back into the laundry basket . You do not need to focus on matching corners or being precise. Basically you just want to fold the clothing over a couple times “flattening” it verses “wadding” it up.

To fit the most clothing discreetly within your hamper, you will need to fold the items close to the diameter of your basket.

Don’t worry about folding the small items like socks etc.. just lay them out flat in between the larger items.

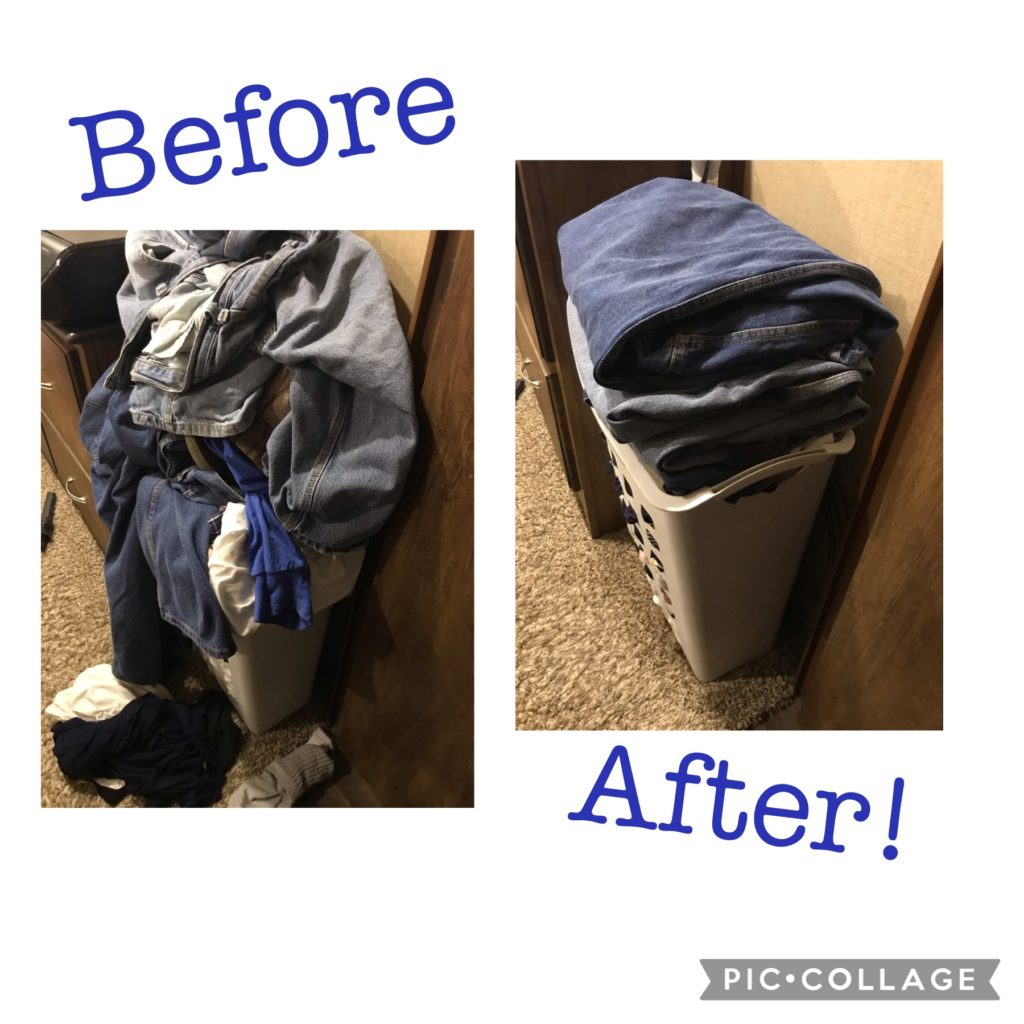
Does This Really Work?

Yes!! Look at the pics to prove it 👍. This doe not “fix” the laundry issue but, it does show you how this little trick can give your atmosphere and sanity a lift until you can get caught up!

The pics shown below have the same exact clothing in each photo.

result example of how to hide yourr laundry pile up

How Long Does This Take?

Well … this depends how fast you are. Personally, this HUGE pile took me less then 10min and that was while chasing two little ones in between .❤️ To some, this may not be worth the time. To others, like me, it’s totally worth it just to give the room a quick do over until I can get caught up. Of course, remember you are sorting the clothing for future washing so go ahead and toss a load in while you’re at it ! This helps cut down on the time also since it is “dual purpose”.

If you have enjoyed this simple little tip please Like subscribe and share below!

Related Post

Removing Fabric Stains https://asimplerlife.blog/?p=540

My Favorite Washing Machine Cleaner https://amzn.to/3HP08MM

A Simple Hand Me Down System https://asimplerlife.blog/?p=340

Best Things To Freeze

In today’s post, I am going to give you a list of my 20 favorite “best” things to freeze (great for beginners)!

Why Should I Freeze Food?

Freezing food is one of the BEST ways ever to save time in the kitchen!

If you are trying to cut down on eating out or save time in your schedule, you NEED TO try freezing!

Cooking double meals , preparing

pre-made frozen breakfast or snacks, and freezing cooked meat not only saves you a ton of time, it can also save you money . Seriously, purchasing sale items to freeze & use later and eating out less can SAVE YOU BOOKOOS!

If popping a frozen casserole in the oven or never having to cook fresh meat before preparing dinner doesn’t sound wonderful then I don’t know what does!

I recommend utilizing your instant pot for preparing bulk meats quickly and efficiently to freeze but a crock pot or stove works too!

Click here to watch how I cook & freeze my fresh chicken for 4 meals, all at once!

Things You Can Freeze By Category

Before I give you a list of my favorite things to freeze, I want you to recognize the different types of foods possible to freeze. I have broke these down into 6 categories for better clarity.

1.Pre Frozen

Items such as a whole turkey or store bought burritos that you purchase and store frozen. Pre frozen foods can be cooked , prepared, or raw by the manufacturer .

2.Pre Cooked

(Pre cooked by you!) such as cooked ground beef, shredded chicken, and leftovers.

3.Prepared

Casseroles, DIY buritos, and soups are all examples of ready to eat/ prepared frozen foods

4.Prepackaged

Prepackaged items that do not fit in the pre frozen category go here.

Examples would be, shredded cheese, hot dogs, sticks of butter etc.

5.Fresh

Fresh chicken, beef, pork chops, and all other fresh meats are in the “fresh” category.

6.Liquids

Milk, broth, pop, soup gravy, Etc.

20 Easy (Beginner) Items To Freeze

Now on to that list…

Shredded chicken

Diced or sliced ham

Ground burger

Raw meat

Whole chicken breast

Shredded cheese

Veggies

Most soups

Baked beans

Soup beans

Cookies

Cake

Icing

Broths

Unopened hot dogs

Unopened lunch meat

Hot dog sauce

Gravy

Butter

Sauces (pasta, marinara, Alfredo, etc)

Caution Or (Carefully freeze)

Bread

Double bag to help prevent freezer burn.

If bread seems a little hard, microwave to

soften before eating .

Potatoes

Cover with other ingredients to prevent

turning black . Under cook a tad to

prevent mushiness

Rice

Add a little water before reheating in

microwave or on stovetop. This makes

the rice soft and moist again.

Block cheese

Block cheese taste great but often

crumbles a little more then usual when

you go to slice it. This does not effect

shredding or melting, just something to

keep in mind.

Opened lunch meat

You may want to double bag in freezer bags and make sure all air is out to prevent freezer burn. Also note, when thawed, meat will have some water from ice on it, this does not effect the taste.

Liquids

Many liquids freeze amazing!

Be sure to leave space for expanding.

If you are storing in freezer bags, you may want to double bag or use double lock zippers to help prevent leakage.

I also like to lay my unfrozen freezer bags flat in a pan to freeze. Once frozen I remove from pan and stack in my freezer. This makes sure my freezer bags freeze smooth and flat allowing for easy stacking and saved space. If a bag happens to leak it is so much easier to clean out a pan than the freezer!

Noodles

Undercook noodles a tad helps them not turn too mushy.

Noodles also seem to freeze better when they are not in liquids like soups, try freezing them in casseroles instead.

Cottage Cheese

Cottage cheese seems to freeze ok as long as you don’t mind the texture broke down a little. I, personally, don’t seem to notice much when in lasagna.

Other Tips For Success

•Add your crackers right before you cook a frozen casserole to ensure a crispy topping.

•Date & label everything with a permanent sharpie before you freeze.

•Use up older stuff first to prevent freezer burn /waste.

•Use freezer zip lock bags (not sandwich or storage bags) to prevent freezer burn & leakage.

•Cut one serving from a reheated frozen casserole then drain excess liquid (water) off of casseroles before serving.

•Forget to thaw a casserole? Baking an extra hour usually does the trick. Be sure to leave covered until at least thawed in oven.

•Cool cooked foods before freezing to prevent spoilage.

•Thaw liquids, soups, and bagged items in a bowl, that way, If they leak you can still used the item and the mess is contained.

•Use thicker, name brand aluminum foil over your freezer casseroles or double cheaper foil to prevent freezer burn.

You will also want to make sure the edges of the foil are tightly crimped around the aluminum pan.

•Check dollar tree for great aluminum pan deals depending on which sizes you are using.

•Timid about freezing a new item?

Freezing a small “leftover” portion the next time you make it can be a easy trial run. If you are pleased with the thawed results, then freeze full portions next time .

GIFT IDEA

Did you know, you can utilize freezing this Christmas?

Click here to read how I gifted my mother in law 2weeks of freezer meals for Christmas last year. She literally cried! She was so touched by the consideration of her busy schedule and the time I had taken to prepare each meal.

What’s amazing is, I was able to make each meal out of my regular grocery budget. I would make a double dinner, we would eat one and I would freeze one. So, the time it took was incorporated into my daily life and nearly unnoticed.

This same concept is used for stocking your own freezer with prepared meals in a time saving way.

*Freezer meals are also great gifts for new moms, elderly, family’s in the moving process, and those fighting sickness or bad health.

Click link here for more gifting ideas .

Gifting Ideas outside the wallet

https://www.asimplerlife.net/post/christmas-preparation-2021

If you have enjoyed this summary post on freezing food then please

LIKE ❤️ SUBSRIBE ❤️SHARE

Happy Freezing!

asimplerlife.net

Overwhelmed By Cooking? This May Be Your Answer!

If you prepare, pack, cook, and cleanup 3 meals a day, 7 days a week at a average of 1 hr commitment per meal.

That’s 3hrs a day and 21 hrs per week that you spend preparing, cooking, and cleaning up food!

Nearly a entire day of your week revolves around your daily meals! I didn’t even include weekly meal planning and grocery shopping or eating!

The point is, meal time is a big part of our daily housekeeping routine and responsibilities as wives. This is why I believe in finding simple but amazing recipes that can simplify your cooking process without sacrificing quality.


Pro 31:18 (KJV)

14 She is like the merchants’ ships; she bringeth her food from afar.

15 She riseth also while it is yet night, and giveth meat to her household, and a portion to her maidens.

16 She considereth a field, and buyeth it: with the fruit of her hands she planteth a vineyard

18 She perceiveth that her merchandise is good:


Learning to cook simple is not about cutting quality and should never involve doing less then your best. It’s actually the exact opposite. We should strive in every way to do our best in all things, especially in the calling God has laid upon us as housekeepers.

Simple cooking should be an opportunity to put your talents to full use.

I learned,several years ago as a newly wed wife that over committing yourself on an already full day can result in

short cuts, burnt biscuits, and a late dinner followed by guilt and feelings of failure.

Don’t get me wrong, elaborate meals have their time and place, but when out of place, can often become overwhelming, especially when lacking proper preparation.

The benefits of a simple recipe

Simple ingredients =simple preparation

Simple preparation = simple cooking

Simple cooking = simple clean up

Simple clean up = a simple evening ????

Choosing a simple recipe(’s)can

simplify the entire cooking process.

Simplifying the entire process can save you time from beginning to finish, allowing you to multi task and accomplish more, with little to no stress.

If you do not have a book, box, or phone full of simple recipes to frequently turn to, then I suggest you begin rethinking your recipe book and weekly menu!

What about my current recipes?

No, I am not suggesting that you ditch all of those amazing recipes! Just that you try incorporating several simple recipes throughout the week within your meal plan. Particularly on those super hectic days. This will make your week go smoother and the elaborate “complicated” meals will become more special and enjoyable to prepare.

???? Idea-

Instead of cooking an elaborate meal all at once, try mix matching “simple” recipes with “complicated” recipes. This can really free up some time and cleanup. You will still get the fancy food you love with a little more wiggle room for your day.

What is a simple recipe?

A simple recipe can be defined in many ways. My personal assessment of a “simple recipe” is when ….

*the recipe contains no more then about 8 ingredients.

*I have most of the ingredients on hand regularly or currently need to purchase none or few of the ingredients listed.

*The recipe consist of only a few steps before ready to cook, saving time and dirtying less dishes for cleanup

What if I’m just learning to cook ?

If this is you, simple recipes are a great place to start!

Trying out simple recipes will teach you the basics of cooking , give you plenty of practice, and allow you to experience plenty of success on the journey.

Where can I find simple recipes?

*First of all, right here I will continue to share my favorite simple recipes!

Check bottom of post for links to past recipe I have shared. If you have not subscribed, be sure to do so at bottom of post!❤️

*”All Recipes” app is my favorite recipe app.

All Recipes provides more then just simple recipes. So be sure to scan the ingredient list first, for signs of simplicity.

Remember, you are checking for a small supply list and several familiar ingredients.

This keeps the shopping and preparing easier and also helps with your budget!

*Google is a great way to find specific recipes.

Search for things like “simple cheesecake recipe” or “easy cheesecake” by typing it in your google search engine.

Online contains a vast source of recipes; it’s just a matter of finding them.

——————————————————-

If cooking has you overwhelmed lately, maybe it’s time to rethink your recipe box

You can start here by checking out some of my past past simple recipe post via link below!

God Bless!

-A Simpler Life-

Like ❤️ Subscribe ❤️ Share

5 Bathroom Cleaning Tips To Help Maintain A Cleaner Bathroom!

Is it just me or is the bathroom quite overwhelming from time to time?

Here are a few tips I’ve came across to keep a clean bathroom 24/7 , (well… almost 24/7 ????)

The biggest and best way I have found in helping me keep up with my bathroom is to maintain in between the “bathroom deep cleans”.

Doing this cuts down on how often bathroom deep cleanings are needed. It also shortens the work when you actually do them, and it provides a cleaner bathroom until the deep clean happens!

So, how do I maintain? I’m glad you asked! It’s so easy, I can’t wait to share with you my 5 favorite maintaining tricks below!

1.MAINTAIN THE SHOWER

When I began tackling the task of maintaining my bathroom, the shower seemed like the first mountain looming ahead of my journey. Here is the best trick I found in succeeding my shower challenge! I hope you love it like I do!

Now I’ll admit I did not come up with this trick on my own, so you may have heard of it before, but just In case you haven’t….

The idea is to keep a rubber shower/ dish cleaning mitt hanging in your shower at all times. You then, wipe off all the dust and soap scum while your taking you’re daily shower.

You’re already in there, so why not?! You will still need to disinfect occasionally when you deep clean but this keeps the dust and soap scum build up from getting out of hand until then.

People using certain safe ‘all natural’ cleaners could even do the disinfecting part! I personally just use the water and mitt.

Don’t have a mitt? Try this technique out by grabbing an extra wash cloth or cleaning rag before hopping in next time.

My shower always (usually) looks so clean now! If you have never tried this before, you seriously should! I personally LOVE this trick.

2.MAINTAIN THE SINK & TOILET

My next tip is to keep disposable cleaning wipes, home made or store bought, under your bathroom sink at all times. You could also keep a bottle of bathroom cleaner & rag if you prefer.

Anytime you are washing your hands and notice the least bit of dirt, dust or grime on your sink and or toilet, quickly grab yourself a cleaning cloth, do a quick wipe and toss!

It will seriously take you like 30 seconds (maybe a minute at most) , and your surfaces will look, feel, and be, so much cleaner.

The fact you don’t have to walk across the house or pause your current project is the key to this tips success.

Just make it a new part of your potty break routine! No one will ever know, and they will wonder how you keep such a sparkly bathroom ????????.

3.MAINTAIN THE BOWL

The toilet bowl, it’s just gross, right? No one wants to see a dirty, stained, or germy looking toilet bowl.

Although grabbing the toilet bowl cleaner and brush seriously takes no time, if you want a couple extra, quick alternatives I’ve got them.

You can purchase this bottle of toilet bowl cleaner from dollar tree, (similar types sold at other stores like Walmart), the bottle hooks to your tank and releases cleaner into the toilet bowl water with every flush.

Another alternative that I now use in my RV life, is to use bleach tablets, (sold at Walmart), the instructions on back say to place one tablet in toilet bowl until dissolved then flush.

Your toilet bowl is now disinfected and ready to tackle a few more days till “deep clean time”!

4.MAINTAIN THE TRASH

This tip is super simple and is probably already practiced by many, but I feel like sometimes we over look the obvious things that can simplify our daily lives so much .

When you ‘do’ deep clean your bathroom, be sure to fill the bottom of your can with enough extra bags to last until the next deep clean.

Then every time you take out the household trash, take a minute to grab the bathroom’s also. Or, if you see the bathroom trash is full before hand, just grab the bag, tie it up, and add it to your main trash (Don’t forget your replace with a new bag).

Keeping extra bags in view and at hand makes trash taking more simple, quick, and clean. It also illuminates stinky/dirty cans.

5.MAINTAIN THE FlOOR

Does anyone else’s bathroom floor get sticky from hair spray, covered in toilet paper dust and just plain dirty feeling, way before mopping day arrives?

Here you can take advantage of those same “bathroom cleaning wipes” under the sink.

Grab a couple and quickly wipe down that floor! If your bathroom’s small, you may be able to get it all in just a couple of minutes. If it’s larger, then this would be more like a ‘spot’ mop, hitting the grimy & prone to be dirty areas like around the toilet and sink. (Anyone have toddler boys???…Lol) .

This is not a deep mop clean and not have the results of one. But it will help illuminate stickiness, extra dirt, dust, and smells ..????????) .. remember though, this is just to help maintain until the real mop comes out .

Links-

Cleaning Mitt (For shower)

By The Dawn’s Early Bright

A Tuesday “Tid-Bit”

Did you know that Dawn dish washing liquid is NOT for just washing dishes? Well, technically it is… but it can do SO much more!

You have probably heard how Dawn is used to clean up oil spills. That sounds somewhat harsh for a house cleaning agent, but what you must consider is the reason Dawn is the ‘go to’ for oil spill clean up. This is because Dawn’s degreasing effectiveness does not hinder its gentleness towards animals and wildlife. So, if you have been searching for an effective stain remover option that will be gentle on your clothing, look no longer!

HOW TO:

  1. apply ORIGINAL Dawn dish washing liquid to stain before wash.
  2. (Just squirt directly from bottle or thin down with water just enough

    to spray through spray bottle)

    2. Scrub fabric between hands, or with

    soft cleaning brush.

    3. Wash in cold or warm water, as

    usual. (Not hot)

    4. Check for stain before drying.

    (Heat often sets up stains)

    5. Repeat wash process if necessary.

    6. Once stain is gone, item can be dried If needed.


    NOTE:

    I can’t promise this will remove ‘every stain every time’. But I will say, it has worked as good as any name brand stain removal i’ve ever used, especially on oil/grease based stains.


    Hope you enjoyed this little Tid-Bit!

    If so, feel free to

    LIKE❤️SHARE❤️SUBSCRIBE!

    What unique ways do you use Dawn?

    Please share in the comments below!

7x Dinner Tips

Try one tip per night this week to simplify your dinner preparation!

1. USE Your INSTANT POT!

If you have a instant pot, (or a smart electric pressure cooker of any type) don’t leave it in the cabinet! Get that baby out and start using it . For two whole years, my electric pressure cooker collected dust. I thought I needed to find the best “instant pot” recipes before I began putting it to use. I was even somewhat intimidated by this contraption because I couldn’t peek in while ‘mid’ cooking.

That’s when one of my dear friends filled me in on all I had been missing out on. She encouraged me to start out with cooking meat in my pressure cooker and forget the meals until I became more confident in the cookers features. I have hardly cooked my meat any other way since! It’s amazing, I can cook a large pack of chicken all at once, (it’s so tender and moist!) And my burger grinds up much easier, without all the grease splatter!

So, if I have one word for you, fear the instant pot no longer! Grab that meat you’ve put off cooking. Check your instant pot settings, manual (or google) to determine the time for your meat. Then go get something else accomplished while it does the work for you! Because that’s what this is about anyway, making dinner prep simpler ????

2. MIX THAT CHICKEN! Did I say mix chicken? Yes!

If you haven’t heard, the rave of the internet is this little trick of using a HAND or STAND MIXER to shred your cooked chicken. This surprisingly works amazingly! And It’s as easy as it sounds! Trim and cook your chicken (preferably in the instant pot) ????

  1. Place 2-3 chicken breast in a large mixing bowl without broth.
  2. 2. Mix on slow-medium speed (Make sure not to mix too much or your chicken will be more like powdered

    parcels instead of shredded pieces)

    This little trick saves so much time, I know longer need to wait for my chicken to cool before shredding or have burnt finger tips from not waiting. And the shredding process itself is so much quicker. I actually look forward to cooking with shredded chicken now!

3. COOK EXTRA.

This sounds so simple but it’s such a time saver in so many ways with dinner prep! Cooking extra of anything can be a plus. The options here are endless, but if you need some ideas on how to use the extras you’ve cooked up, then keep reading!

4. USE IT

if you love leftovers, consider making double once or twice a week and plan for a couple ‘leftover’ nights. If you’re not big on “traditional left overs” then try turning your leftovers into new meals, add them to a casserole or heat them up as a easy throughout the week. (No one will ever know)! Don’t want to eat anything twice this week? There’s still a solutionfor you! (next tip ????)

5. FREEZE IT

So, you have cooked a bunch of extra meat, or even a entire extra meal, you won’t be able to use them in the near future, now what?Freeze it! This seriously saves so much time!Imagine being able to pull out a frozen pot of soup in a gallon freezer bag.

Thaw, heat, and eat!

Can’t get much easier then that!Or my favorite.. only cooking raw meat once or twice a wk! (If that!) The trick to this? Cook your meat in bulk (I usually do this once a week, rotating types I purchase) . Keep out what you need, then freeze the rest in one meal portions. Once you have a small stockpile built up, you can thaw & heat the meat of your choice, this saves loads of time!I learned this trick from JORDAN PAGE. Look up her you tube channel or blog for lots of great tips for cooking & FREEZING food, while budgeting for a big family! She’s great, Thanks Jordan!

6. DON’T WAIST TIME ON TADER’S!

First of all if your don‘t know what a “tader” is, it is Kentucky talk For potato! I’ve been a big fan of the traditional hand potato peeler for a long time . (I love the Rada brand) that is, until I discovered a amazon treasure! The electric potato peeler! When I cook any homemade dinner, I usually want some good, homemade mashed potatoes to go with it. But I really hate peeling potatoes! Now with my electric potato peeler, I don’t dread the job! Anytime I need potatos peeled for a recipe I let my electric peeler do the work. While it’s peeling, I chop them up (if chopping is needed). And Wa-La! The job is cut in half. Considering how much I like this appliance, personally I feel like the price is very reasonable. I have had my rotator for over a year with know issues. It’s very easy to wipe off. And is compact! Bow what about those nights you are really hurting for time, but you still want something besides instant potatoes. On nights like this, you might consider the Bob Evans pre made REAL mashed potatoes. They have several flavors. And are sold at many wallmart’s and Kroger’s. Yes, you will be paying for convenience, and I don’t recommend it on a regular basis. But if it’s in your budget and you have a week that you need the convenience, then go for it! (You can also check out your stores generic version of these pre made potatoes).One thing I like about these, they are SO QUICK to heat up, they usually have a couple weeks before expiration date, and they taste JUST LIKE homemade mashed potatoes! 7. MEAL PLAN

This tip may be obvious and many of us take it as a given. But really, meal planning will save you more time then anything with meal preparation.Plan your weekly meals before you shop so you are not scrambling for your ingredients.As you begin your day, check or decide which meal you want to make early on. This gives you time to thaw out any frozen items and gives you the chance to begin any additional prepping throughout the day, instead of all at once, or at the last minute. Interested in more tips for meal planning? Keep checking my blog for more on this topic!

Hope this article helps! If you enjoyed this post then Please LIKE and SUBSCRIBE! ❤️ New post will be added each week! God Bless, Other articles you may be interested in!