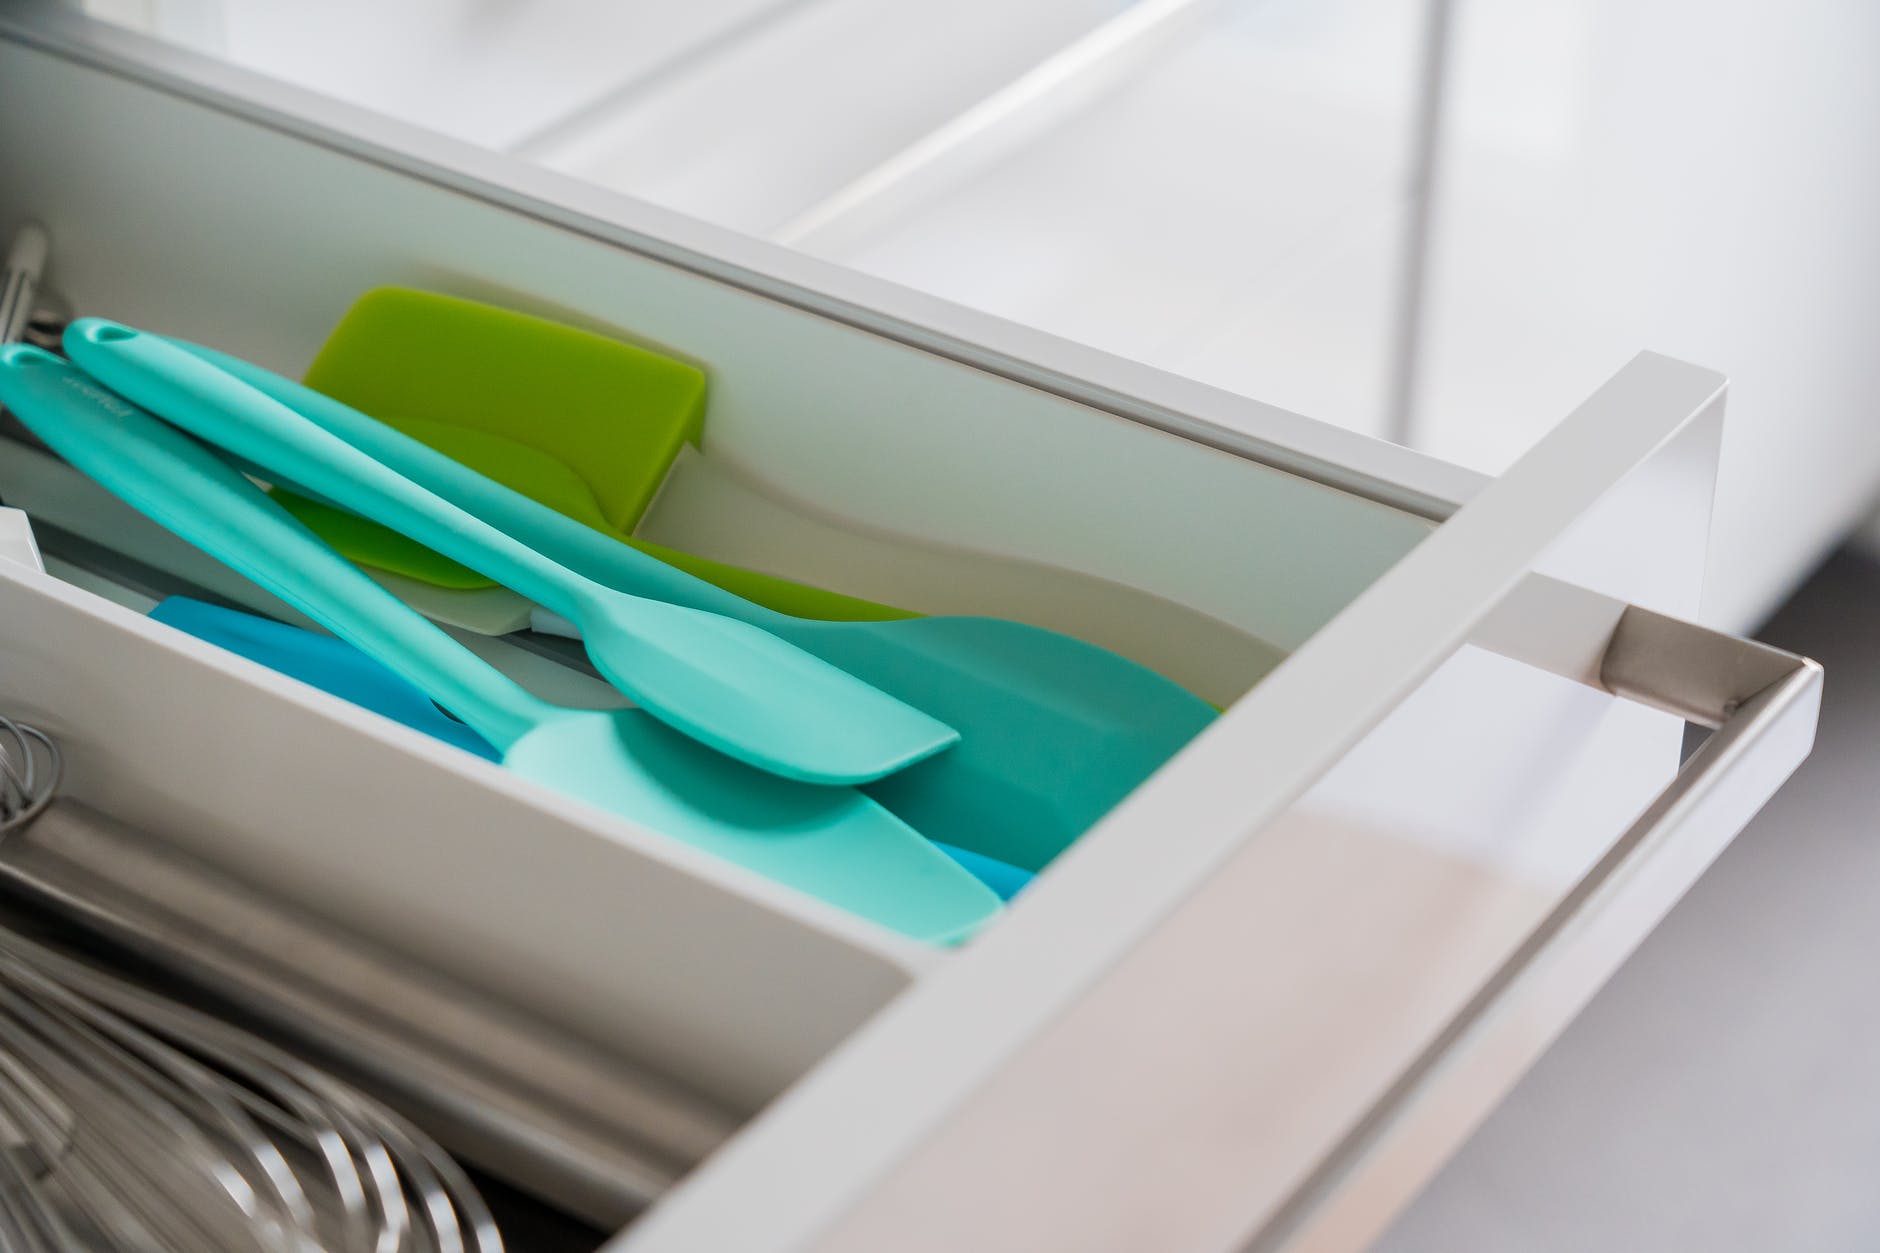
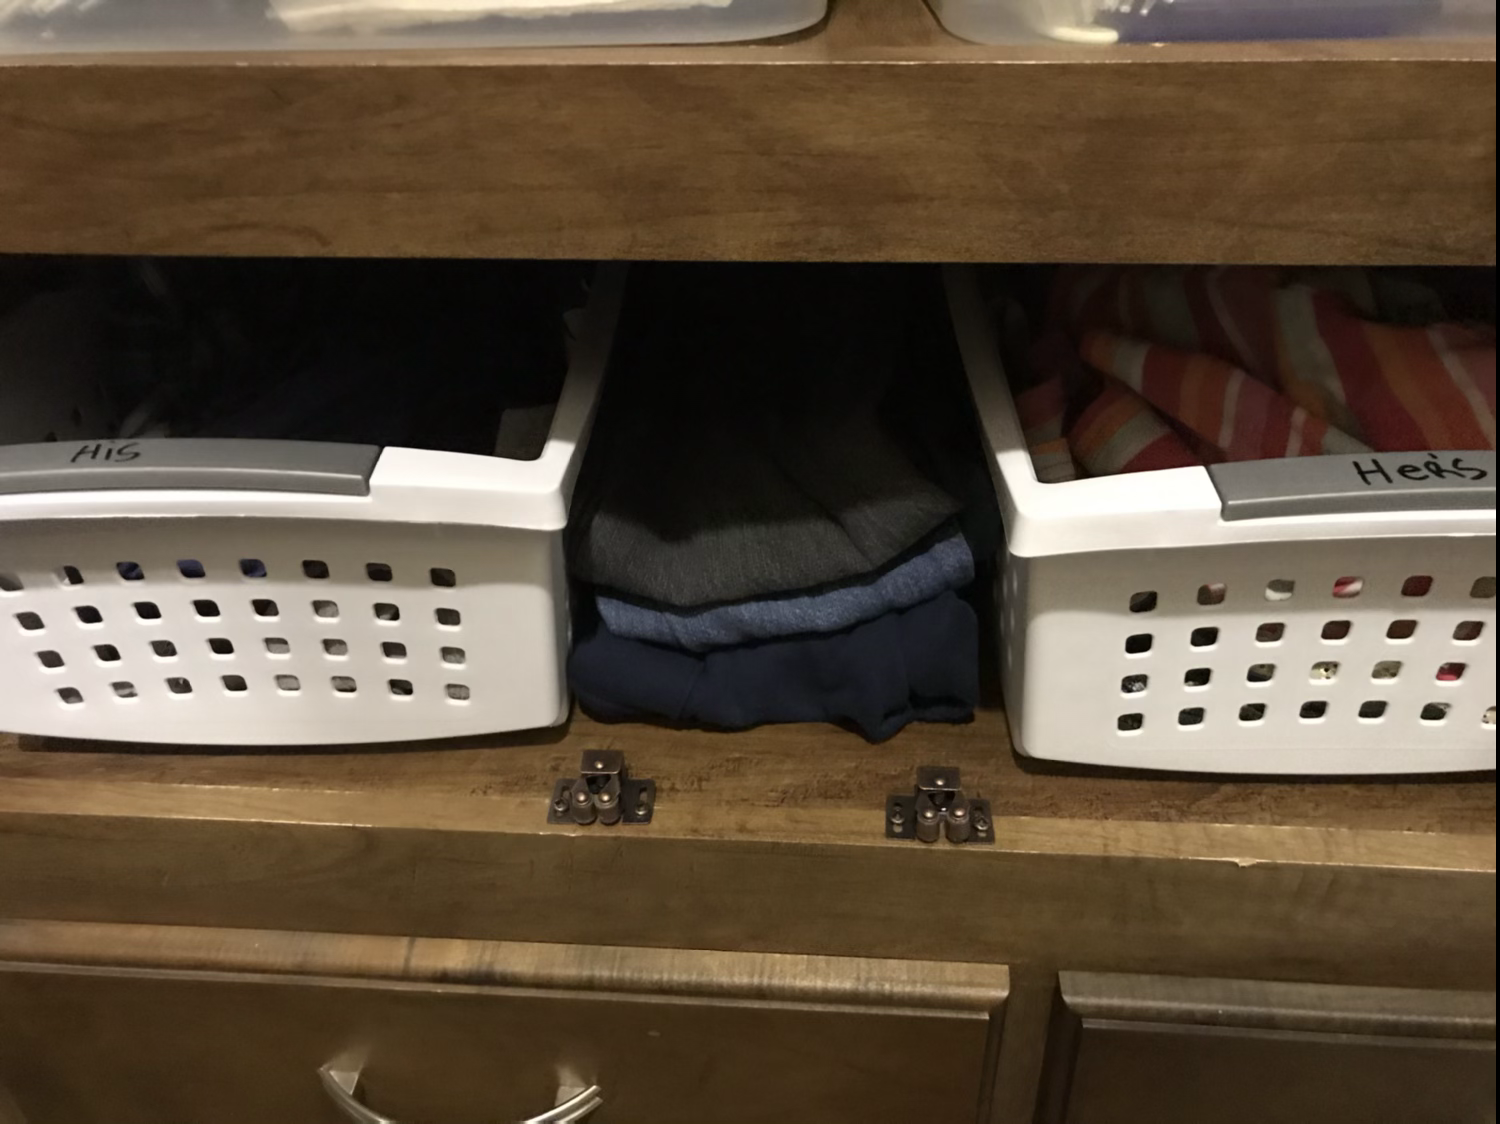
10 Ways To Simplify Your Life As A Mom

1. Stay Organized

Staying organized, even at a basic level, can simplify your housework tremendously! The number one way to stay organized is to give everything a home. (Labels help as a reminder to yourself & to your family where that home is). Giving everything a home makes it easier to put things away & save time of looking for lost items.
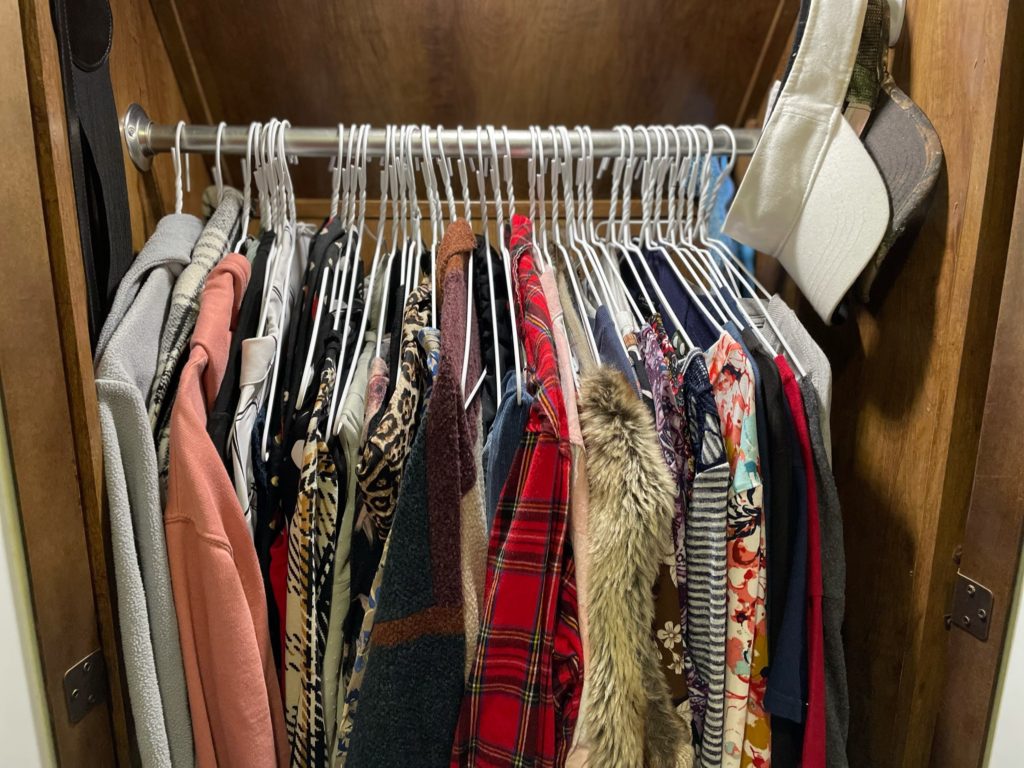
2. Always Declutter

Decluttering is halfway done once you have given everything a home ! ⬆️ You will often find that when you have to much stuff, items don’t have a “home” at all. This is a sign that you may have more inventory than your space allows for. I encourage you to reguarly keep a donation bag going. This helps the clutter stay down so much! Some people think this is over kill…. but have you ever thought about how many items we bring into our home on a weekly basis? Why is it that so much less is usually being rotated out? Eventually, these items began to pile up in our closets, cabinets, drawers, and floors. Ladies, it’s time to declutter! And if you’re feeling a little wasteful, it may be time cut back on how much you are bringing in too! A good rule of thumb, when shopping, is to ask yourself “ do I really need this item?” If yes, then ask yourself if you will actually use it? Lastly, where will it belong in your home? Sometimes the answers to these questions will help us prevent “impulse” purchases.

3. Make a morning routine

Morning routines don’t have to be super strict (although they can be). A morning routine is simply an orderly pattern of events that happen on most mornings to make your day go smoother. Having A morning routine puts your brain on auto pilot, accomplishing some of the most important things first thing in the morning. It also sets a routine for your family, they know what to expect and can comply without confusion. A morning routine is a great way to start of your day! Morning routines can be flexible and can even begin at a different time each morning if needed.

4. Make a bedtime routine

A bedtime routine has the same benefits as the morning routine. Bedtime may or may not be a very happy time for your children. Having A routine really helps skip the unhappiness of “bedtime” with little children. They begin to know exactly what to expect when “bedtime” comes and the fight becomes less. Bedtime routine also enables the children to be more independent with certain bedtime responsibilities, since they know exactly what’s expected next. Older family members can also jump in easily. Here’s a little tip- I like to add something relaxing/ calming to do with my children as part of bedtime routine. This helps calm and wind them down making it easier for them to fall asleep.

5. Stay stocked on household necessities & food staples!

Staying stocked up on your everyday grocery and household items is a must! Constant runs to the store for things like “an egg” before dinner can be finished, “toilet paper” before friends comes over, or “kids Tylenol” at midnight, these hectic runs can be everything BUT smooth in our lives. Staying stocked up (even just a little extra) can save a lot of stress, time, and chaos!

6. Keep a running grocery list

Keeping a running grocery list will not only keep you from “running out” of items unexpectedly but it can save time by cutting down on the grocery trips per week. Sitting down and making a grocery list right before your trip is fine, if you have an amazing memory, but if you’re like me and often forget items, then I encourage you to keep a running grocery list! Anytime you think of an item you need to restock, write it down! Then at the end of the week, when you’re ready to grocery shop, you can sit down and finish that list like you usually would without missing a thing.

7. Do basic Meal planning

Does meal planning over whelm you? It doesn’t have too! Some people love extensive meal planning techniques and that’s great if that’s your thing. But If this overwhelms you, don’t just through out meal planning all together. There is a simpler way that can still give you some of the benefits without all the extras. Simply grab you a piece of paper, your planner, and a pen. Decide how many meals you need to cook that week. Now it’s time to glance through those cabinets and fridge and see what you got. Make a mental or physical note of anything in particular that you would like to use up before it goes to waste. Sit down and began writing down ideas using the foods you just seen. Consider exactly how busy you will be that week when choosing what meals to prepare. As you write each meal down, write the “needed” ingredients for that meal on your shopping list. That’s it! Now, if you’re worried about what day to cook which meal, stop stressing! Those can be swapped at any point in time. I like to use erasable pens (pencil would also work) so I can easily erase and swap meals as my week goes on. You could also slide your meal plan in a protective sheet and use a dry erase/ wet erase marker or a dry erase board.

8. Pre cook meats

Precooking meats in bulk can littlerly save you a ton of time and make dinner preparation 10 times easier! Imagine having your meat all cooked nearly everytime you began dinner? Wow! That’s what you can do for yourself by pre cooking meat and you can do it soo easily! My favorite way to pre cook meat in bulk is in my instant pot. It’s so quick and easy! I then freeze it in meal size portions to easily thaw and use for meals.

9. Have a “town day”

Setting one designated town day is one of my favorite ways to cut down on the craziness and keep a smoother flow going in our home. Running to town constantly and unexpectedly can really disrupt the daily flow of your day. Having one main “town day” can help the rest of the week run smoother. How does this help? First of all, it’s more efficient to do all your errands while already in town. Secondly, you can plan for less housework on this day and really focus on accomplishing the “away from home” duties. You can also plan dinner accordingly on town days. This frees up the rest of the week for a more “normal” schedule.

10. Use a daily planner

Planners may not be for everybody but using a daily planner really helps me stay on top of things! I’m able to jot down things on my to do list, mark dates on my calendar, tuck important papers in the back to file later, keep my running shopping list at my finger tips, and so much more! All do all of this in my little, compact, Sue Hooley planner! (Linked below)

I hope these 10 tips help you simplify your life even more in the future! I would love to hear about ways you simplify your life in the comments below!

Don’t forget to subscribe to my blog!

Subscribe

YES! I Want to receive post alerts & password protected content as a “Subscribed Homemaker”!

We don’t spam! Read more in our privacy policy

How to manage toys in my home

selective focus of a girl covering her face with pinwheel
Photo by cottonbro on Pexels.com

How to manage toys in my home

Before we discuss “How to manage toys in my home”, let’s first confront our “toy” mindset. 

Our mindset, in most any project, often affects the outcome of our project. Therefore, if we approach the topic of toys with the same mindset as we have in the past, then how can we expect our “toy management” to ever improve? As my husbands often quotes…

If you always do what you’ve always done, you will always get what you always got. 
 

 Most of us will admit our children probably have or “have had” too many toys. In my opinion, simplifying the toy inventory is one of the best ways to learn how to manage toys in a home. Well, that with a little organization. Lol. 

Maybe it’s just me, but the first thoughts of simplifing or how to manage  toys often brings guilt. My mind quickly fills with thoughts like these..

  1. If I How do I know which toys my kids will or will not miss?
  2. They might not play with this now, but they will grow into it one day?
  3. But… I spent SO much money on that toy! 😭
  4. What if “grandma” gets her feelings hurt?
  5. I don’t want to “deprive” my kids
  6. How will my children feel when they realize they have less toys than their peers?
  7. What will my mom friends think? 
  8. If I go through with this, where do I even start?
  9. Will it even help?

It is thoughts like these that explain why it’s so hard for us to let go of some of the toys our kids may not have touched ALL YEAR LONG!!!

Now that we have confronted some of the thoughts your mind may be facing, let’s compare these thoughts to a few facts that can lead us to the problem of “how to manage toys in our home”.


Fact #1
The cash value of a toy does not always equal or determine it‘s value to your child. Ask yourself what is your child’s favorite toy? Maybe it‘s something expensive or maybe it’s like my 3 yr old (A $.50 pinwheel fan) . 


Facts  #2                                                                                                                                                         In other words, hoarding expensive (or cheap) toys that your children no longer find entertaining, does not justify the past expense you or the giver once made. If they never touch it, there’s a good chance they won’t miss it .


Fact #3
If your children are anything like mine, then they don’t have to worry about a toy shortage in their near future.


Fact #4
If my children have too many toys now, then why do I feel like I need to hoard more toys for them “to grow into? ”Is it possible that keeping all of these “extra toys” is setting yourself, your kids, and your home, up for future toy overload? I’m not advising to never hold onto anything jusdon’t hold onto EVERYTHING!”

Fact #3

Every child is different!

If you have more than one child, you have probably learned by now that each of your children’s prized toy possession is a different type of toy. Just because you save your firstborn’s favorite toy doesn’t mean your second child will treasure or love that toy the same way. I made this mistake myself big time!

I kept several of my son‘s favorite baby and toddler toys, so sure that his baby sister would cherish these perfect toys the same way.

To my surprise, she would hardly touch some of the toys! Instead, she found her own favorite toys that fit her personality and interest best.

Lesson learned!


Fact #4

We must do what’s best for our child and our home. If that means downsizing the toys, then lets figure out how to do it with as little drama as possible. Imagine a room with toys your child actually played with. I’ll let you think about the pros of that for a moment…


Can learning how to manage toys in my home really benefit my family?

  1. Benefits for my child                                                                                                                       Think to a time when your house was out of control, laundry and dishes piled high, stuff everywhere and the feeling of overwhelm is quickly rising . Now, imagine our children’s little minds when its time to “pick up” their excessive amounts of toys. Talk about a brain overload! Reducing the amount of toys your child owns decreases the amount of required responsibility to maintain and reduces the overwhelm involved. Plus who wouldnt want to be able to find their favorite toy without digging through a toy box of unused and unloved toys?

  2. Benefits for you                                                                                                                                Less toys means less mess, less mess means less uncalled for  responsibility, uncalled for responsibility means less stress, less stress means happy wife, and we all know what happy wife means… happy wife… LOL, just kidding but really, the benefits are pretty self explainable. Less things of any category is easier to maintain and can often be more enjoyable to have and easier to appreciate. I’m sure you’re wondering by now, where are the tips on how to maintain the toys in my home by simplifying?!  At least thats what i’m hoping you are wondering…if not, then I may have failed at helping you refocus your mindset.😝


Let’s simplify, so that I can manage toys in my home!

Is there really such a thing as a simple toy room?

I wasn’t so sure either! But when I decided to incorporate this “simple” word into our toy room, I sure noticed some benefits really quick!

There are SO MANY great methods to simplify but these are tips I have personally found beneficial in managing the toys in our home. I hope you benefit from these tips as much as I have!


Tip #1 Toss Out Broken Toys And Toys With Missing Pieces

I love doing this first because it’s QUICK, EASY, and you can see the results quickly!

Sift through your child’s toy bins, toy box, drawers, bookshelves, and anywhere else there may be hidden toys. Quickly gather together all toys containing broken or missing pieces. And that’s it! This step is done.✅

Tip #2. Look For Doubles

Does anyone else’s children end up with several of the same or similar toys? These toy “doubles” are a perfect opportunity to DONATE & SIMPLIFY! Oftentimes our children have no need for 2, 3, or even 4 of the same types of toys. SO why not jump on this opportunity to simplify? Keep the best and favorite (or even favorite’s) of the double items then rid of the rest.

Tip #3. Condense Categories                                                                 

So.. your child loves barbies, hot wheels, or blocks. That’s great! But so many of these “FAVORITE” category toys seem to get out of hand over time. Everyone byes them for every occation and we even find ourselves purchasing these favorite items at every chance we get just because they LOVE them.

Oftentimes we can condense a toy category without illiminating it. For example, when my little boy was just a toddler he had just learned to build with chunky blocks. He would dump them all out and builds a ‘one block’ wide block tower until it’s to tall to stand,, then cheer as he watched it fall over.  Over and over he would do this obviously loving his blocks and being entertained greatly.

This response is exactly what I look for in a toy. With that said, I for sure didn’t want to ditch the blocks BUT on the other hand, my son only played with a a max of about 1/4 of the massive bag of blocks. The rest of the blocks would lay in my floor never touched until time to pick up.

This is a perfect sign for me to “condense a toy category”.

Not much time went by before I quickly added these extra blocks to the donation bag. Another plus! This gave me just enough room to add his building block tonka truck into the block bag

(Cleaning up yet another toy from the toy bin). ⭐️SCORE!⭐️

To be honest, my 3 year old never noticed the change in his blocks. But Momma sure did! Block time was just as fun and the clean up was much easier.  As he got older and his building skills began to improve, he was ready for more blocks to be added to his collection. Was I worried? Nop,e not at all, for just as a suspected, he received more blocks as gifts.


Tip #4. Rid of unused toys

This can be the hard one. I hope the change of mindset that we discussed in the first part of this post has prepared you for this.         

I do recomend trying to see each toy through your child’s eyes instead of your own. Forget the pricetag or where it came from and focus on the practicality. This can really help as you go through the “unused” toy category. Now i’m not recomending waistfulenss of expencive toys but I do recommend  putting unused expensive toys up for the future, selling them, re-gifting them, or passing on to someone who will appriciate and use it.

Even getting rid of a few unused toys can make a BIG difference to start with!

Tip #5. Don’t worry about the future                                                    This is something I’ve found myself hung up on more than once. The truth is, many of us hold onto a ton of old toys for our younger kids to ‘grow into’. I’m not suggesting to rid of ALL of these future toys but how about reconsidering the amount we keep. Think about the reason you are holding onto these extra toys and ask yourself if less toys could possibly fulfill this purpose. Also consider all of the toys or cash for toys that your kids may recieve as gifts in the future. Will they even need your future toy stock?


Time To Adjust

Now that we’ve completed these 5 tips of how to simplify toys in your home, managing should become a lot easier! I do recommend giving time for you and your children to adjust to your simplified room then Repeat these steps as necessary or as you feel needed! ⏱

Lastly, consider incorporating some kid friendly organization for the toys to help out with clean ups and maintenance. Hope this article motivates you!

If you have enjoyed this post please subsribe via subscription form below to receive new post updates! Also, as a Subbscribed Homemaker you will access to my password protected page that contains FREE printibles and special content!

Happy Homemaking!

Subscribe

YES! I Want to receive post alerts & password protected content as a “Subscribed Homemaker”!

We don’t spam! Read more in our privacy policy

Organization Tip!

Try out this organization tip by using the tip of a marker!

Why do I own SO MANY MARKERS? Because you can use them for SO many things! If you don’t use markers regularly for your household needs, you are really missing out. Markers provide a simple, quick, frugal, and effective way to organize. Adorable labeling is so fun but sometimes you just need something a little quicker and simpler, even if it’s temporary.

Here are just a few ways I use permanent markers in my everyday homemaking.

Label Dishes

Don’t lose your dish again. Label glass dishes before taking to events away from home. Most permanent marker can be washed right off of glass dish ware with a little soap and elbow grease. If that don’t work, use a metal scrubby or hand sanitizer. Always “test” a small area if you’re not sure or skip permanent and use wet erase

Plastic is much different than glass. Do not use permanent markers on plastic dishes, it will be very hard to remove.

Label Freezer Items

Don’t freeze ANYTHING without labeling it first! You may never remember what that brick of food is but the label will. Be sure to label food before you freeze it. This prevents freezer moisture from “erasing your writing”. Also, be sure you dry off your freezer items after packaging & before labeling for the same reason.

Label Zip lock bags

Label zip lock bags for snacks, diaper bag organization, left overs, personalization, and anything else you use zip lock bags for.

Personalize Items

Personalizing items via marker can really help children keep up with there things. Some items I personalize need a permanent marker but others need wet erase, it really depends on the time. Examples of items to personalize would be snacks, cups, bottom of shoes, cubbies containing child’s clothing, chore chart, and the list goes on

How I use wet erase markers in my home

Wet erase markers (NOT dry erase) are wonderful for of all types of things!How I went years without realizing there was such a thing, I’ll never know! Wet erase markers only erase when wiped with something wet like a wet cloth.

Give Everything A designated Home With A Wet Erase Marker

You can label almost any plastic bin with a wet erase marker! When you change things up, just wipe off the marking with a damp cloth or baby wipe, dry, and re label! SO EASY. This is the best way ever to motivate yourself to put things back in their “homes”. It also provides an easy way for your family to find things & put things away themselves.

Bins for things like clothing, diapers, medicines, toys, school supplies, and games, can all be labeled … put it in a bin, give it a name, and it can have a label!

Organize Your Refrigerator

I love organizing my fridge with wet erase markers! After a month or two, the moisture does try to erase the labels but it’s not inconvenient at all to wipe them off while wiping out the fridge and add new ones every once in awhile. I love the look of a organized fridge. Maybe that’s because I don’t see one often enough 😂.

Label Leftovers

Another way I like to use a marker in the kitchen is to date my containers containing left overs before placing them in the refrigerator. Sometimes just writing the day of the week and placing it in a visible spot can do the trick. That way you are reminded what needs used up, promoting less waste.

Hosting

You can use wet erase markers to label cups when company is over. Prevent the cup mix ups and wasted “I don’t know who’s that is”, with a quick label. Pre label by using a simple 1,2,3,4 method or wait until serving and add each persons name or initials.

You can also label food dishes that you serve including drink pitchers, letting everyone know what they are getting.

Label Totes In Storage

Keep your garage or building organized with a wet erase marker. If you have dark colored totes you may not be able to see direct marker writing. In that case you would need to apply paper or vinyl labels to write on first.

Use Dry Erase Markers To Save Paper

Laminate everything, then grab a pack of wet or dry erase markers and re-use those list and charts. A few items you can laminate and use wet erase and dry erase markers on are …

Preschool charts

Reading charts

Writing charts

Map

Shapes chart

Chore charts

To do list

Packing list

Children’s saving chart

How to Get permanent marker off of somthing .

It’s gonna happen eventually when dealing with markers. You are going to use the wrong marker on the wrong surface and it just won’t come off 🤦‍♀️. Or.. your kids get ahold of that one marker you left out….. now what?? Germ X to the rescue! Actually and kind of hand sanitizer or rubbing alcohol will usually remove permanent marker. You can also run a dry erase marker over a permanent markers marking to help loosen its tight bond.

A few items you may have on hand to remove those marks are…

-Hand sanitizer

-Rubbing alcohol

-Bug spray

-Disinfecting wipes

Preventive

Remember to always test using permanent markers on items first!

Never use any markers on fabric, cloth or leather. If it is not plastic or glass you probably shouldn’t use it if you want to remove it.

Make a home for your markers too, way up high away from your toddlers. 😂


Hope you have enjoyed this post.Be sure to check out my previous post on “homing items” .

Don’t forget to like, subscribe, and share!Happy Homemaking

Related post

Homing Items

Check out some of our homeschool laminated charts that we use our markers on here!

What are the benefits of giving everything it’s own home?

silicone spatula on a kitchen drawer
Photo by Castorly Stock on Pexels.com

Giving everything it’s own home has so many benefits!

  • Prevents overflow
  • Saves money
  • Simplifies housekeeping
  • Has many flexible benefits
  • Saves time

More on the benefits of giving everything it’s own home…

My friend’s daughter can not stand when her mom asks her to put something in its “home”. She declares that only “PEOPLE have homes, NOT THINGS! “However I, along with her mother, beg to differ! I am a firm believer in giving everything it’s own home.

So, why is it that so many people use the term “home” when referring to items? Probably because of the MANY benefits that come from giving each item a designated place in your house, AKA “home”.

Here are just a few benefits, I myself have discovered by “giving everything it’s own home ”. Yes, I said EVERYTHING!

Giving everything it’s own home can prevent overflow 

When everything has a home, and it’s all put away, you can tell if you actually have room for more possessions. How can we expect ourselves to keep everything put away, if there physically is not enough space for everything to be put away? I mean, let’s be reasonable here! Sometimes (so guilty) we expect too much.

Let’s give ourselves a break! Maybe there really is a legitimate reason I haven’t been able to “keep up” lately. It wouldn’t hurt to take a moment to evaluate and find out! If you don’t have the space to “home” everything you now own, then it is a good sign that maybe you need to rid of a few items and is a great reminder to slow down on the purchasing!

Giving everything it’s own home can save you money!

I often ask myself “where will I home this?”  before making a new purchase. If I cannot think of an available “home”, then I automatically know that I need to rid of something to make room. I don’t know how many times I have walked away empty handed, realizing I didn’t want the ‘new’ item that bad after all.

Giving everything it’s own home simplifies housekeeping

How can we expect ourselves to keep everything put away, if there physically is not enough space for everything to be put away? I mean, let’s be reasonable here! Sometimes, (so guilty) we expect too much of ourselves. Let’s give ourselves a break! Maybe there really is a legitimate reason we haven’t been able to “keep up” lately.

It wouldn’t hurt to take a moment to evaluate and find out!

After giving everything it’s own “home”, you should begin to practice the habit of placing things back in there home after each use. This will super easy, because now, you don’t even have to think about what to do with each item. Thanks to already doing the hard part!

And even if some things do get stranded… that is okay! When you finally  get the chance to pick up, those scattered items can quickly and effortlessly make it back to their “home” and easy to find for their next use.

Giving everything it’s own home has many “flexible” benefits

One thing I love about giving everything it’s own home, is the flexibility of benefits.

For example, when my first child hit the toddler stage, I was constantly putting back each item as he dragged them from their “homes”. I continuously fretted and worried that he would hurt himself or break something.

My first solution was to temporarily place my items up high or out of reach each time I caught him after something. Then I would put them back where they belonged, once he had fell asleep or moved on to “other” things😂 .

One day, my husband suggested that by moving some of these things “permanently”  it would probably make my life a little easier.

(Now why hadn’t I thought of that…..)

After a little bit of consideration, I quickly tucked my pride away, and got on it, re-homing many of my items.

I’m a creature of habit and the homes I had made for each item had became part of setting my routine BUT my husband was right, it was time to MOVE on. (Literally & figuratively)

Over the next little bit, I began to re home item after item, everything from decor, to furniture. And yes, my life got much easier!

Now I can rest assured in knowing that, when my house is picked up and everything is put back in its “home” it is pretty much childproof in this state!

This has became a huge incentive of mine to regularly put things away.

*You can use this same concept to “pet proof” your home or to make it handicap accessible etc.

Giving everything it’s own home is a time saver

Imagine with me, you need your keys, hammer, or ice cream scoop. You’ve spent 5, 10, maybe even 30 minutes searching, all to no avail. Wouldn’t it be so much easier if you instantly knew where your needed item was? Every single time! (Well… almost every time lol) Giving everything it’s own home can do just that!

In Closing

I would love to know if you practice homing items and if so, what benefits have you noticed in your life from it? 

If you enjoyed this post then please like and share!

Also, don’t forget to subscribe via subscribe form for new post announcements, special content and more! 

Related Post

How to quickly clean out my closet

I clean out my closet as a necessity being part of a full time RV family!

full time rv home

Home IS Where You Park It…

I guess I should start out by clarifying that when I say ‘clean out my closet’ I am referring to clothing. Although I do store a few items in my closest besides clothing, I do try to make the main use of my closet for clothes and clothing related items such as shoes, hats, belts, etc.

How to quickly clean out my closet

closet cleaned out
  • Remove excess hangers
  • Remove & store ‘out of season’ items
  • Remove definite “don’t keep” items
  • Remove “don’t wear” items for further examination (more on this below)
  • For each item you choose to keep, shift it to its appropriate place in the closet for quick organization

A closer look at cleaning out my closet

Remove excess hangers

Removing excess hangers is a quick and easy way to clear up some space. You can take them completely out for good or you can add them back in neatly on the side when you’re through.

Remove and store out of season items

Storing out of season clothing items separate from your closet is a great way to free up some space. Be sure to give your storage space a limit and rotate the seasons accordingly. Some great seasonal clothing storage solutions are : A small tote, A shrink storage bag, a square cube bin, or a old zip up bed set bag. Be sure to store the items away from moisture and keep them sealed well. If your entire seasonal storage cannot fit comfortably into your wardrobe, it’s time to downsize!

Remove definite “don’t keep’ items

Definite no keeps are those items that you wonder how they even got in your closet. The shirt you have been meaning to get rid of or the dress that really belongs to your sister. Removing these items is another quick and easy step to clean out your closet.

Remove “don’t wear” items for further examination

Now for the last step to clean out your closet! This step has always seemed a little bit daunting to me and that is why I save if for last. No, not because I’m putting it off but for the exact opposite. I believe getting the super easy steps out of the way clears a lot of space up fast and gives you a boost of motivation, making this last “harder” step seem less overwhelming.

Many post I have read instruct you to rid of all of the items you do not wear without further examination. This is one area I differ on when I clean out my closet.

Before you toss the “I don’t wear” item in the donation bag, I would like you to ask yourself a question.


Why Don’t I Wear This?

The answer to this question can direct you in this last step to clean out your closet.

Here are some common answers you may find yourself with

  • It doesn’t fit anymore
  • I like it hanging up but I don’t like it on me
  • It is uncomfortable
  • It’s sentimental
  • It was given to me
  • I spent a lot of money on it
  • I have others just like it
  • It doesn’t fit my lifestyle
  • I just never get to it
  • I forgot I had it
  • I don’t like to iron

Let’s break it down

It doesn’t fit anymore

We all have those clothing items that just don’t fit anymore right? I’m not going to suggest you get rid of ALL of your too small clothing, nor am I going to suggest you keep it all. Let’s be real here, consider your current situation. Are you in the process of losing weight? Is your situation temporary due to a pregnancy or illness? How “too small” is this particular item? Do you really love this item or do you just love its size?

Asking yourself many of these question can help you recognize the reality of situation better and make a confident decision. It’s good to have a small selection of items for weight loss but don’t go overboard, make yourself a storage limit for these items away from your wearable clothing.

Also, keep in mind that many people like to splurge on a few new items after weight loss. Some even use it as a weight loss incentive, consider if you are one of these type of people when making your decision.


I like it hanging up but I don’t like it on me

So many times my closet has been littered with this exact type of clothing. It looked so cute when I bought it! Maybe I didn’t try it on or maybe your taste has changed. The best solution I have found to deal with these items, is to simply depart from them and be sure to try on clothing before purchasing whenever possible.

*There is no reason to allow a item to clutter your closet if you wont wear it.


It is uncomfortable

When I was a teenager, it didn’t really matter to me how uncomfortable clothing was, if I liked it, i bought it. The difference between now and then is this; then, I actually wore the uncomfortable purchase. Now, it mostly ends up sitting in my closet. If you’re uncomfortable clothing has ended up on your “don’t wear” list, then you are probably in the same stage. It’s hard to break old habits but how about we part with these uncomfortable clothes and STOP PURCHASING THEM in the future.


It’s sentimental

Sentimental items can be hard to deal with. Each person carries their own amount of sentimental feelings. A few things to consider would be…

  • start wearing the item and enjoy it
  • store it in a memory bin
  • make something out of it (there are so many adorable items you can make from old clothing nowadays. (try a Google search)
  • display it (depending on the item, there are shadow boxes etc)


It was given to me

This item probably lands in several of the other “don’t wear” categories because if it didn’t, you would be wearing it. Whether your Grandma bought the wrong size, or your friend purchased her style instead of yours, now you have this item that you feel like you can’t part with. Here are a few suggestions I use when I clean out my closet, hopefully they help!

  • Consider the person before making your decision. Is the buyer more practical or sensitive ? Did they make a sacrifice for this purchase or was it a pass down? Do they notice everything or are they forgetful and care free? Knowing your gifter can help you handle each piece of clothing wisely. You never want to be or even appear to be ungrateful.
  • If you simply do not like the item, try it on with several different items before you completely decide against the piece. It may end up being the perfect match to something after all.
  • If you still do not like the item, try wearing it a few times around the giver or take some cute pics in the outfit to send to them to show your appreciation. Then after you have gotten some use from the item and some time has passed re visit the item. You may find you like it after all or you may decide to part with it. Sacrificing your feelings can be a great part of being thankful.
  • The last tip I have here is to be honest. This relates to the wrong size not if you don’t like the item. If someone tells you they have the receipt if you need to exchange, take the liberty to kindly tell them the item does not fit. Be sure to TRY IT ON first, to show your sincerity. Most buyers would much rather you return the item for the correct size than for their purchase to not be used. This also lets them know your correct sizing for future purchases.


I spent a lot of money on it

Spending a lot of money on a item that you no longer wear can cause a lot of guilt. What you must realize is, that holding onto the useless item does not make the situation better but only worse. My advise here is to simply let the item go and remember how you felt when purchasing new items. Allow this to teach you to be very specific in your spending choices.


I have others just like it

Having too many of a type of clothing can result in overlooked pieces. This is a great opportunity to donate! Figure up how many of this type of clothing you need between your wash cycle and toss the rest.


It doesn’t fit my lifestyle

Do you have 5 exercise shirts but never exercise? Maybe you have a wardrobe full of T-shirts that you only wear on the weekend. Realizing what you wear and how much you wear it can really tell you what categories of clothing you need most . Don’t hoard clothing you don’t wear.


I just never get to it
OR I forgot I had it

Anytime I have clothing that lands in this category, I count it a great opportunity to clean out my closet some more. I mean think about it, you won’t even miss these items when they are gone!

I don’t want to iron it

Hopefully, I am not the only one that by passes a outfit due to its need of ironing 😂. No joke, I have enough ironing to do with 2 “men” in the house, I figure why buy clothing that needs constant ironing for myself when ladies clothing have so many iron free options. If you are like me, i recommend passing that wrinkly shirt on and doing the wrinkle test next time you shop!

For each item you choose to keep, shift it to its appropriate place in the closet for quick organization

This is a quick organization tip. Organize while you declutter and declutter while you organize! They should go hand in hand.

After!

If you have enjoyed this post, please like subscribe and share below!

Also check out my related post here!

A simple toy room

The benefit of homing items

Small space child saftey products

A simple hand me down clothing system

Laundry stain remover

Making Room For Christmas Toys

I figure many parents, like me, are looking at their child’s room thinking “what are we going to do when Christmas gets here?” If you have found yourself asking this question then It is time to be making room for Christmas toys!


Now Is The Time

NOW is the time to start simplifying, decluttering, donating, or whatever you want to call it. Whatever you do, don’t wait until after Christmas! Do it while your children are excited about the holidays and before it becomes a serious clutter problem.

If your sneaky, small kids may not even notice the toy downgrade. For other children, have a talk with them and explain the problem, then let them help decide what to keep and what to get rid of.

Most kids love the idea of getting rid of toys for possible new ones. Help them make a Christmas list after going through their possessions.

Encourage your child to donate some possessions to less fortunate children or sell them for a profit.

If you are really desperate you can purchase the toys yourself. ????

Where To Start ?

After your child choices the “few” toys he is willing to part with, you both may need some direction for the process to keep going smoothly. Keep in mind this is probably a big deal to your child, practice patience, be kind, be understanding, and be persuasive! Here are a few pointers to keep you on the right track.

1. Toss Out Broken Toys And Toys With Missing Pieces.

I love doing this first because it’s quick, easy and you can often see a difference quickly! Sift through your child’s toy bins, toy box, drawers, bookshelves, and anywhere else there may be toys hiding. Quickly gather together anything broken, missing pieces or inoperable.

Encourage your child to help.

Explain that they could ask for replacements on their Christmas wish list if it’s something they really enjoyed.

And that’s it! This step is done ✅

2. Look For Doubles.

Does anyone else’s kids end up with several of the same (or nearly the same) toys? These “double” toys are a perfect opportunity to DONATE/SIMPLIFY! Oftentimes we have no need for 2, 3, or even 4 of the same things. SO why not jump on this opportunity to declutter! Show your child just how many of one item they have. Explain how there really is no need to have so many and it would make more sense to keep their favorite while passIng the rest on to someone who doesn’t have one. No, your child may not be exuberant about the idea but there is a good chance they will come around.

3. Condense Categories. So.. your child loves barbies, hot wheels, or blocks. That’s great! I don’t know how your home is, but in mine, so many of these category type toys seem to get out of hand over time.

Oftentimes we can condense a toy category without illuminating it . For example, my toddler is just learning to build with chunky blocks. He dumps them out and builds a ‘one block’ wide block tower until it’s to tall to stand, then cheers as he watches it fall over. He does this over and over obviously enjoying his blocks.

This response is exactly what I look for in a toy. With that said, I for sure don’t want to just ditch the blocks. BUT on the other hand, he usually is playing with only about 1/4 of the massive bag he received for Christmas. The rest of the bag lays in my floor never touched until time to pick up.

This is a perfect sign for me to “condense a toy category”.

Not much time went by before I quickly added these extra blocks to the donation bag. Another plus! This gave me just enough room to add his building block tonka truck into the block bag

(Cleaning up yet another toy from the bin). ⭐️SCORE!!!!!!!⭐️

To be honest, my 3 year old has not even noticed the change in his blocks. But Momma sure has! Block time is just as fun and the clean up is much easier. ???? It’s a WIN-WIN ! As he gets older and his building skills begin to improve I’m sure he will want more blocks for his collection . I’m also sure that if the past is any for-telling, then he will probably receive more blocks as future gifts. So, Nope. I’m not to worried.

4. Unused Toys

This can be the hard one.

to help get you through this step! Try to see the toys in your child’s eyes and not your own as you go through the unused toy category.

No you don’t have to rid of every single toy that your child doesn’t constantly play with, just starting with a few completely unused toys can make a BIG difference!

This one May be hard for your child, but laying out several and asking them to choose one or two to get rid of may help. Remind them of which toys they really don’t play with much, if they insist this will change offer a trial time period with the agreement of getting rid of the toy at the end of the period of its still not used. If certain toys are literally never seen or touched, you may get by sneaking them to the garage and eventually out.

5. Toys For The Future This is something I’ve found myself hung up on more then once. The truth is many of us hold onto a ton of old toys for our younger kids to grow into. I’m not suggesting to rid of ALL of these toys, but how about reconsidering the amount we keep. Think about the reason you are holding onto these extra toys. And ask yourself if less toys could possibly fulfill this purpose just as well.

*Don’t be the parent that holds onto more toys than your child. You’re just setting a “pack rat” example before them.


Now that we’ve completed these 5 simple steps, give time for you and your children to adjust to your simplified room then Repeat these steps as necessary or as you feel needed! ⏱

If you accomplished your goals for this room in one quick evening then congratulations ???? !! But If it takes a little longer and some extra effort to start feeling true results then that’s ok too!!!

I’m with you There!

Give your kids a clutter free environment to play with the toys they actually love and room to receive more this holiday season!

Hope this article motivates you!

If so, then Please

LIKE ???? SHARE ???? SUBSCRIBE!


A Simple Hand Me Down System

*Don’t have kids? keep reading!

Many of these storage tips can be used for any type of clothing , such as weight loss or maternity storage.

If you want to be frugal in the clothing department, then yes, I do recommend keeping some of your child’s outgrown clothing for future/younger children.

The key here to keep it simple is to

not keep them ALL

Totes and totes of unorganized clothing in a building or attic can quickly become overwhelming and piled up. Here is what I recommend to help simplify the clothes passing process!

First of all, Only keep the minimal amount of clothing needed to dress a child in each specific size.

If you know your child easily gets by with 7 daily outfits at this age, then try not to keep more then that for your future children.

Also take into account , holidays or events that you may regularly purchase new outfits for each child (like Easter)

Lastly, leave room for deals you come upon, pass downs from friends, or clothing gifts they may receive from others.

Now that we know not too keep it all, How do I decide what exactly to keep?

A few rules I keep in mind when deciding which pieces to keep are …

1.If it’s worn out, throw it out

2.If it’s seasonal, only keep a select few

3.Don’t keep more then you need

4.Keep more of the most used items .. (for example …..)

keep hard to replace items

(this could mean expensive or hard to come by) examples .. little boy suits, little dolly dress, or a specific style sailor outfit.

keep items that are in that are still in good shape and will last through another child

I only keep a few select favorite seasonal outfits. There’s always less chance of these items being used again depending on different birthdays or child sizes.

Once you decide how many outfits you want to keep per each size, label yourself a tote, with the exact size ranges it will contain. And label it boy or girl.

This is very important! If your storage is not organized or stored properly, you are less apt to use it or be able to find it in the future.