August life update

So here’s a little life update for August !

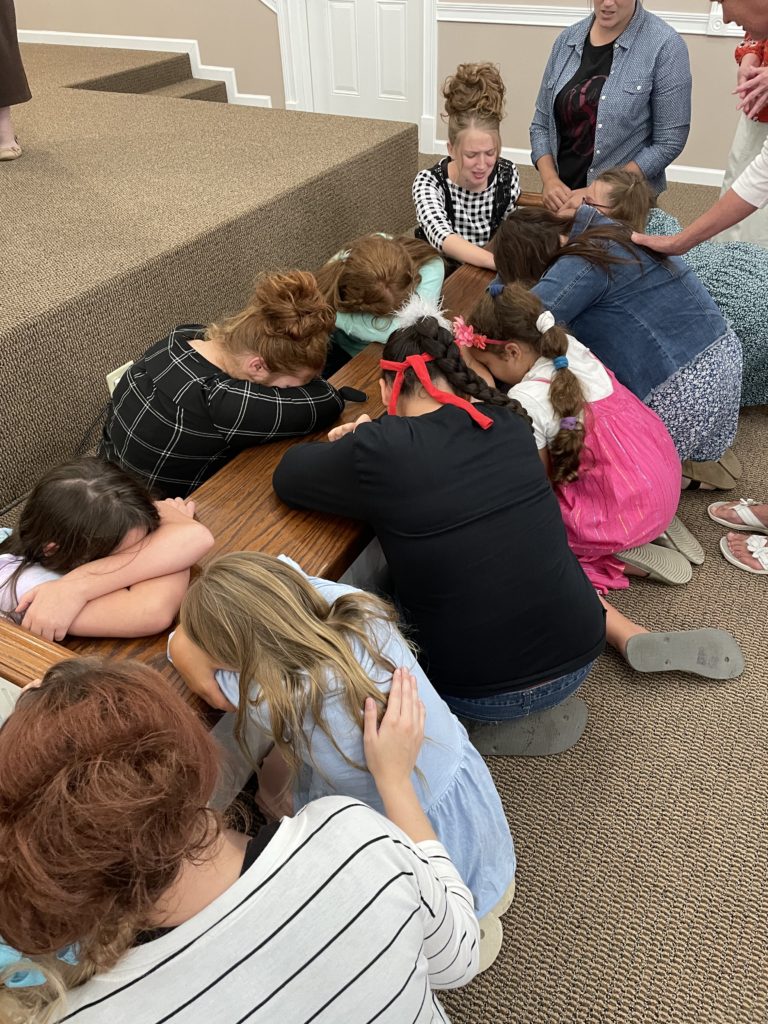
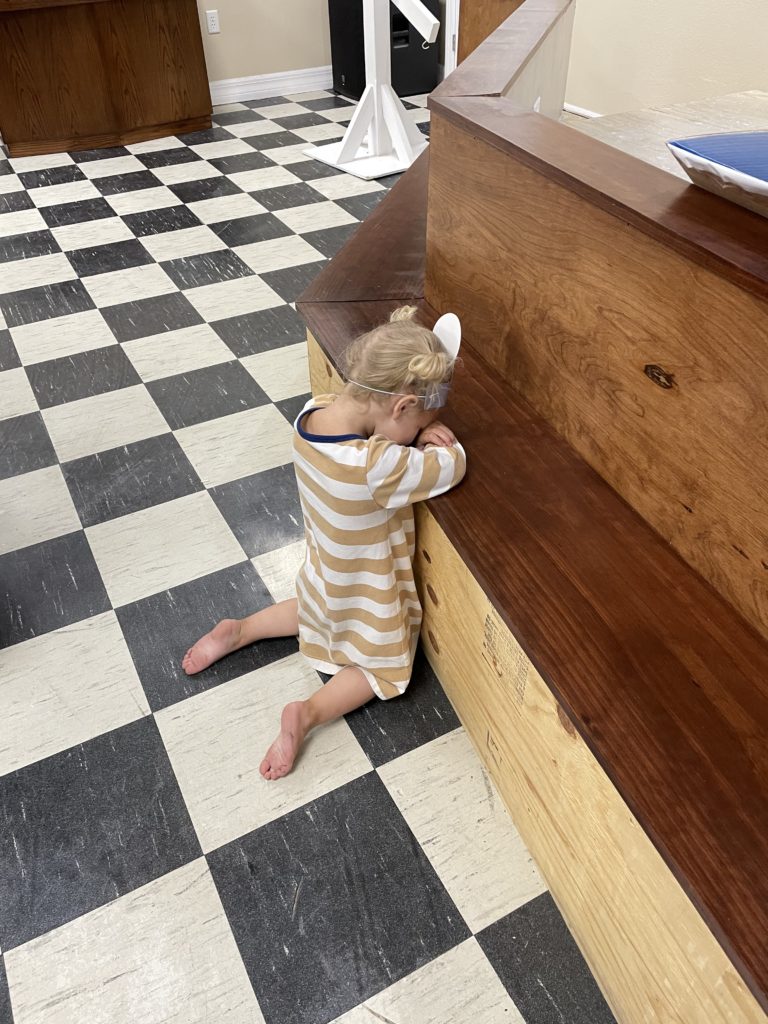
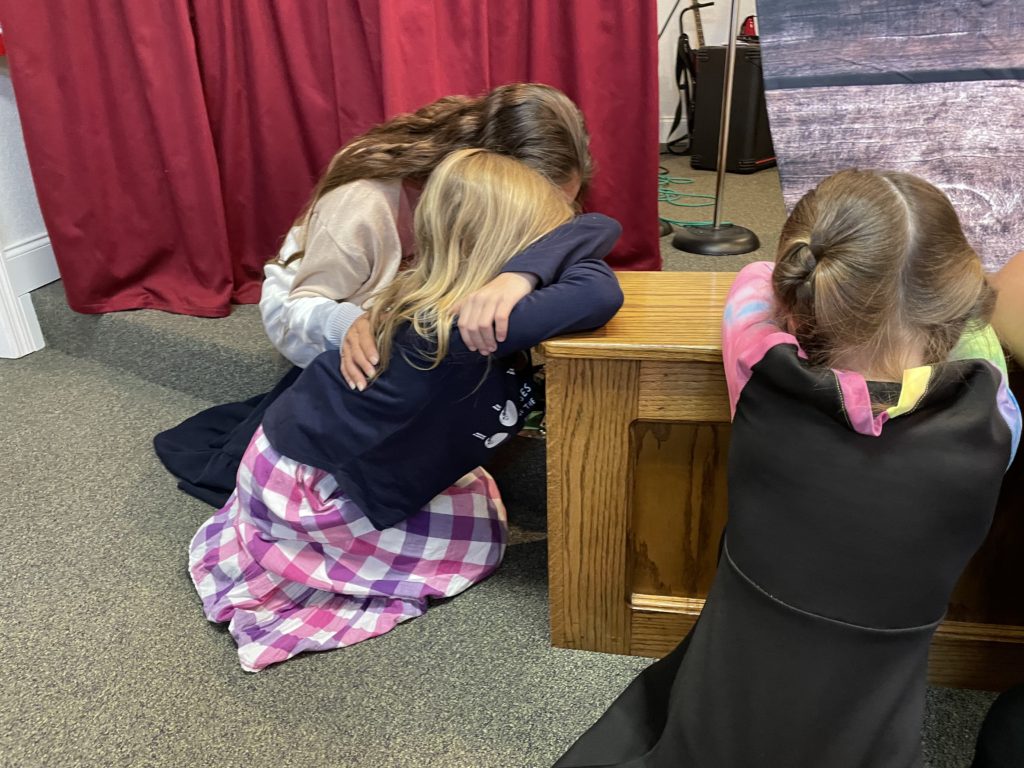
Next week we will start out 7th kids crusade for this year. I am so excited to tell you that we have had several children pray to be saved and even one parent accept Christ as their Savior during 2022 kids crusades ! 

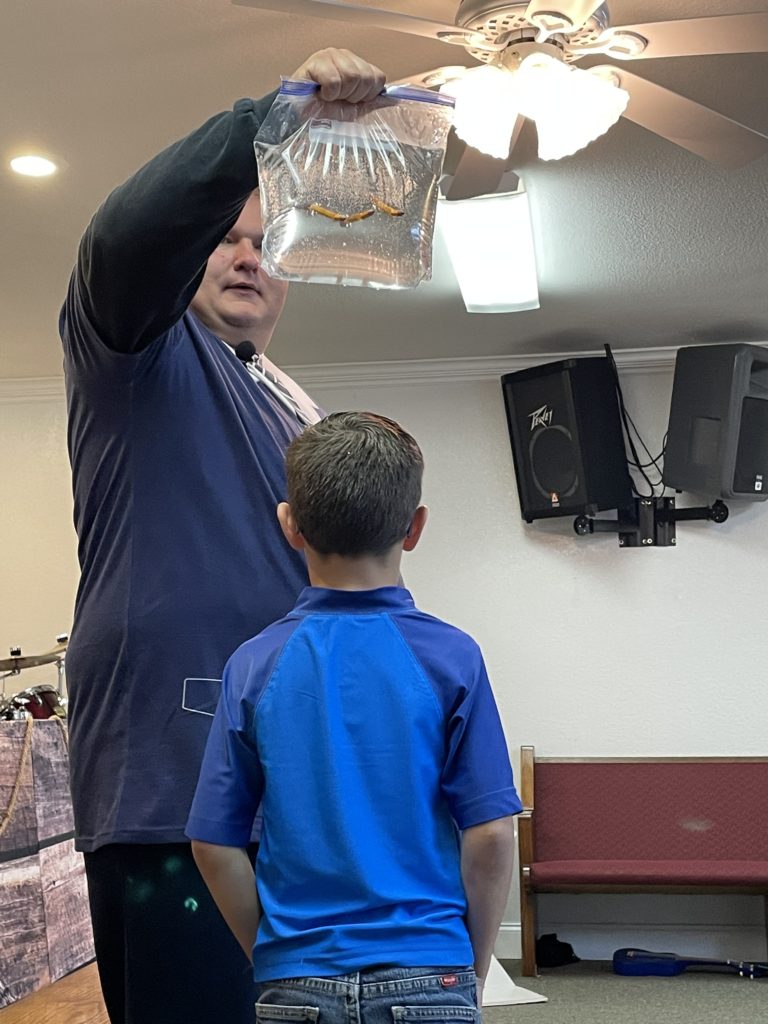
We have had a lot of fun hosting these  crusades. There’s a special blessing that comes with working hand in hand with so many of God’s people and really getting to know them in a better way. Anyone who has done kids crusades, VBS, or any type of children’s ministry realize how much work is done behind the scene but these same people understand that even one child accepting Christ is worth it all and that’s why we do this. It always strengthens me at the end of a exhausting night of games, skits, stories, songs, and sermon, to see a child weeping in the alters experiencing God for himself. 

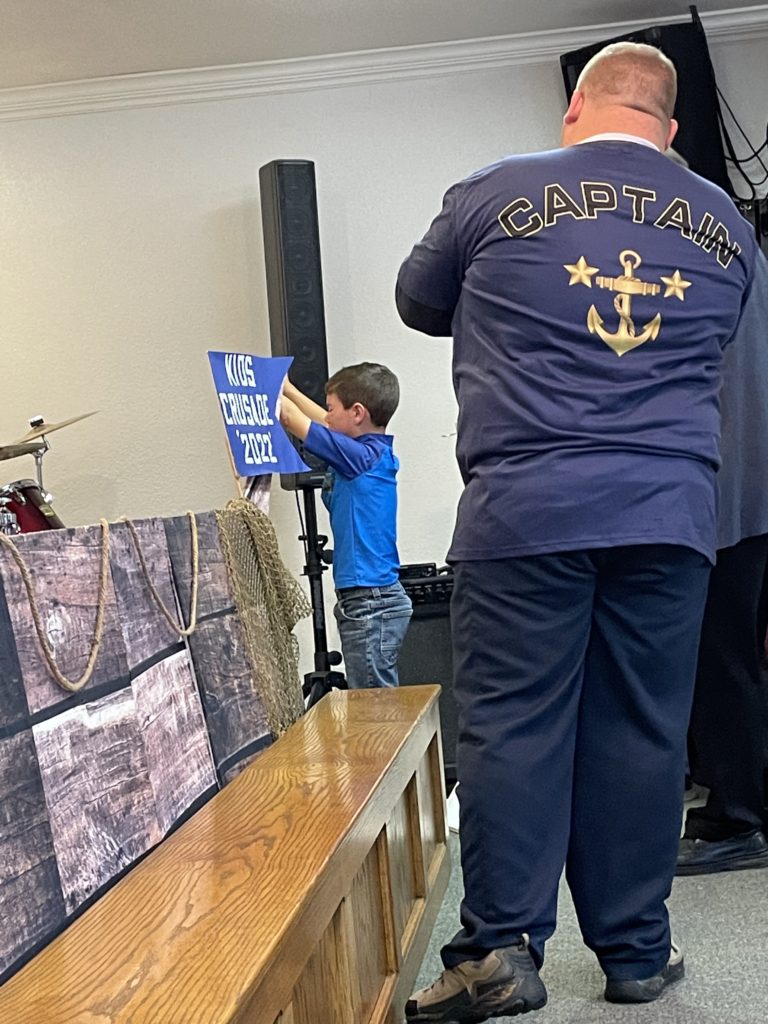
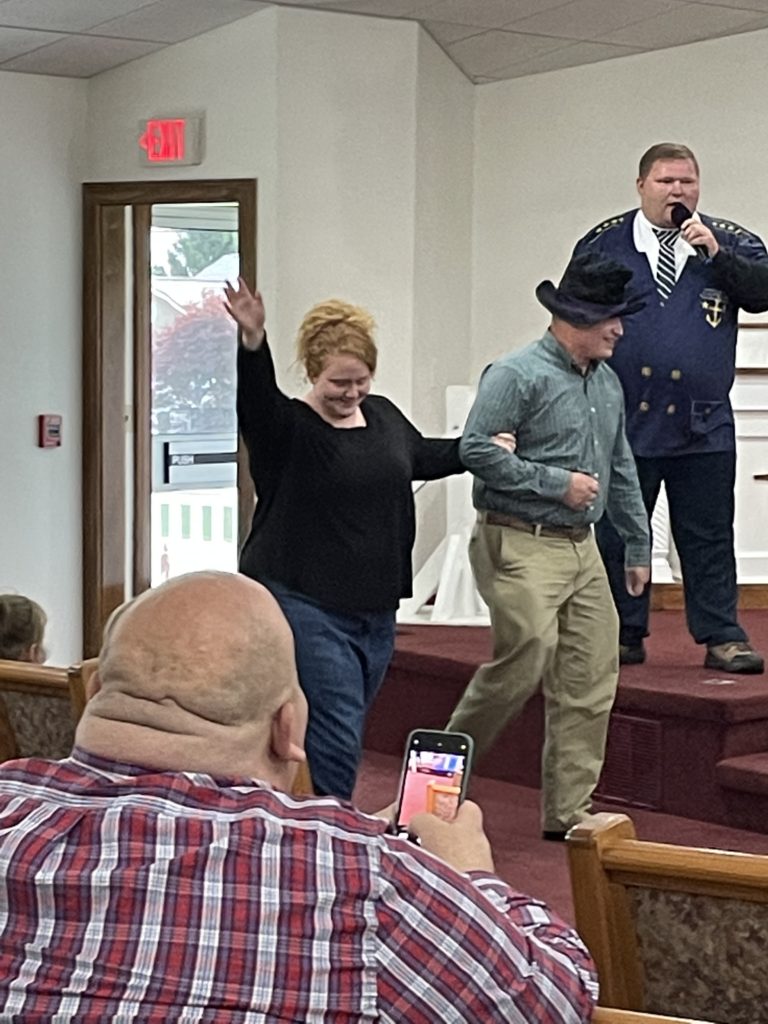
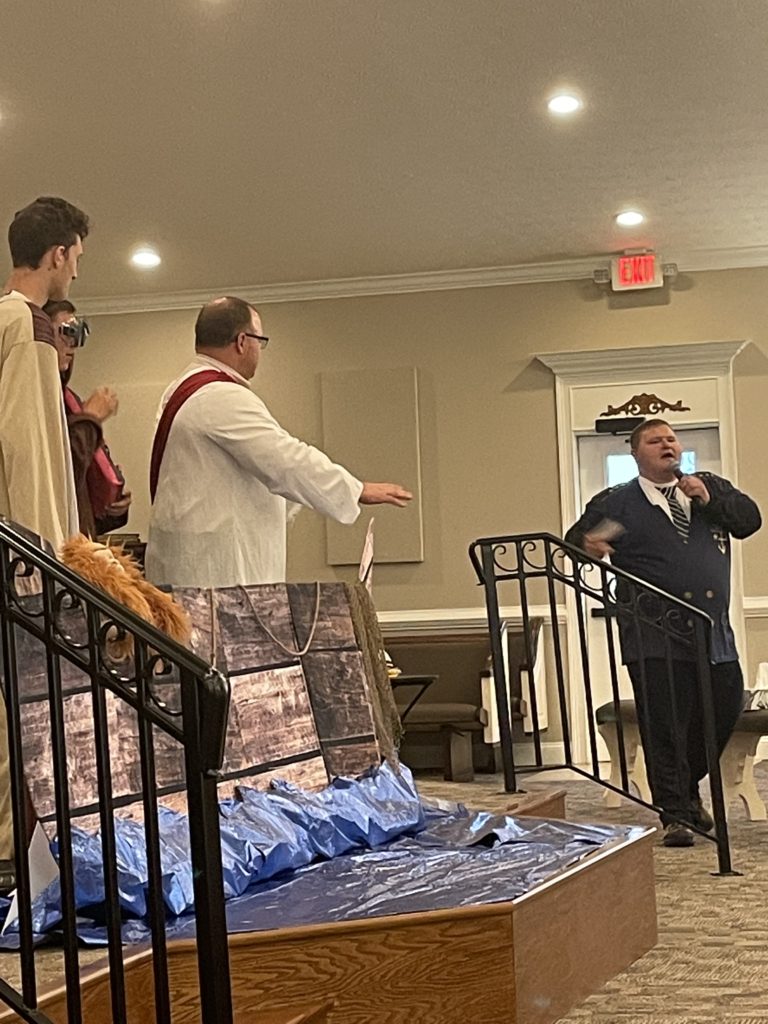
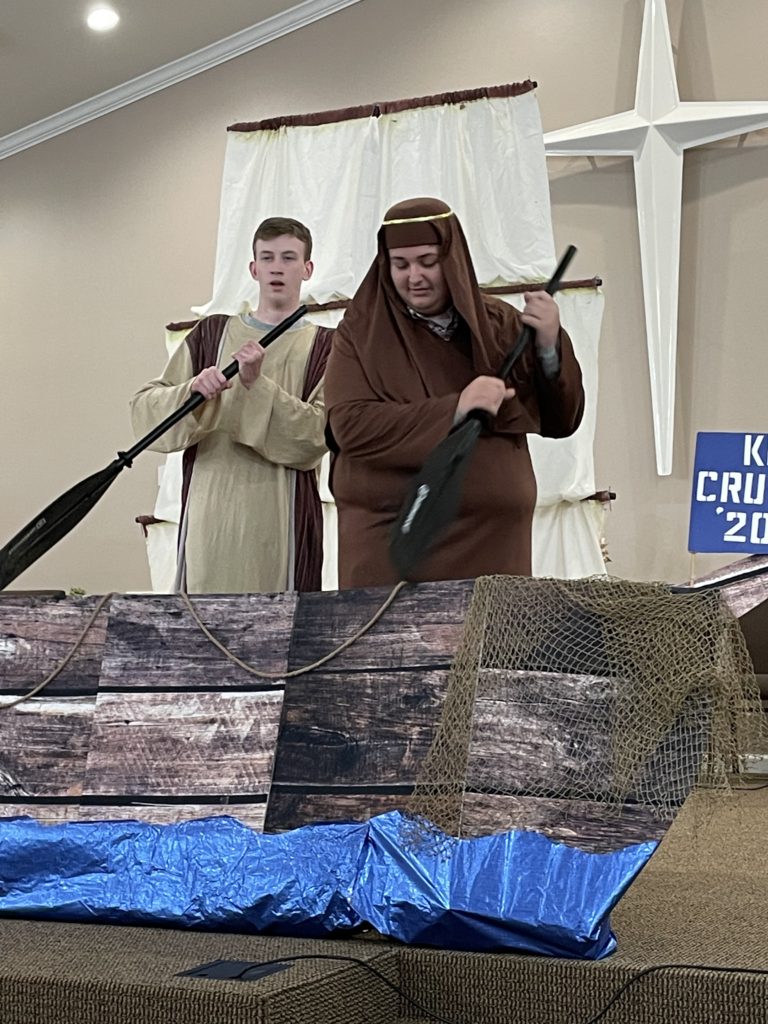
I thought I’d add a few pics of our crusades in this month’s life update, check them out here! 

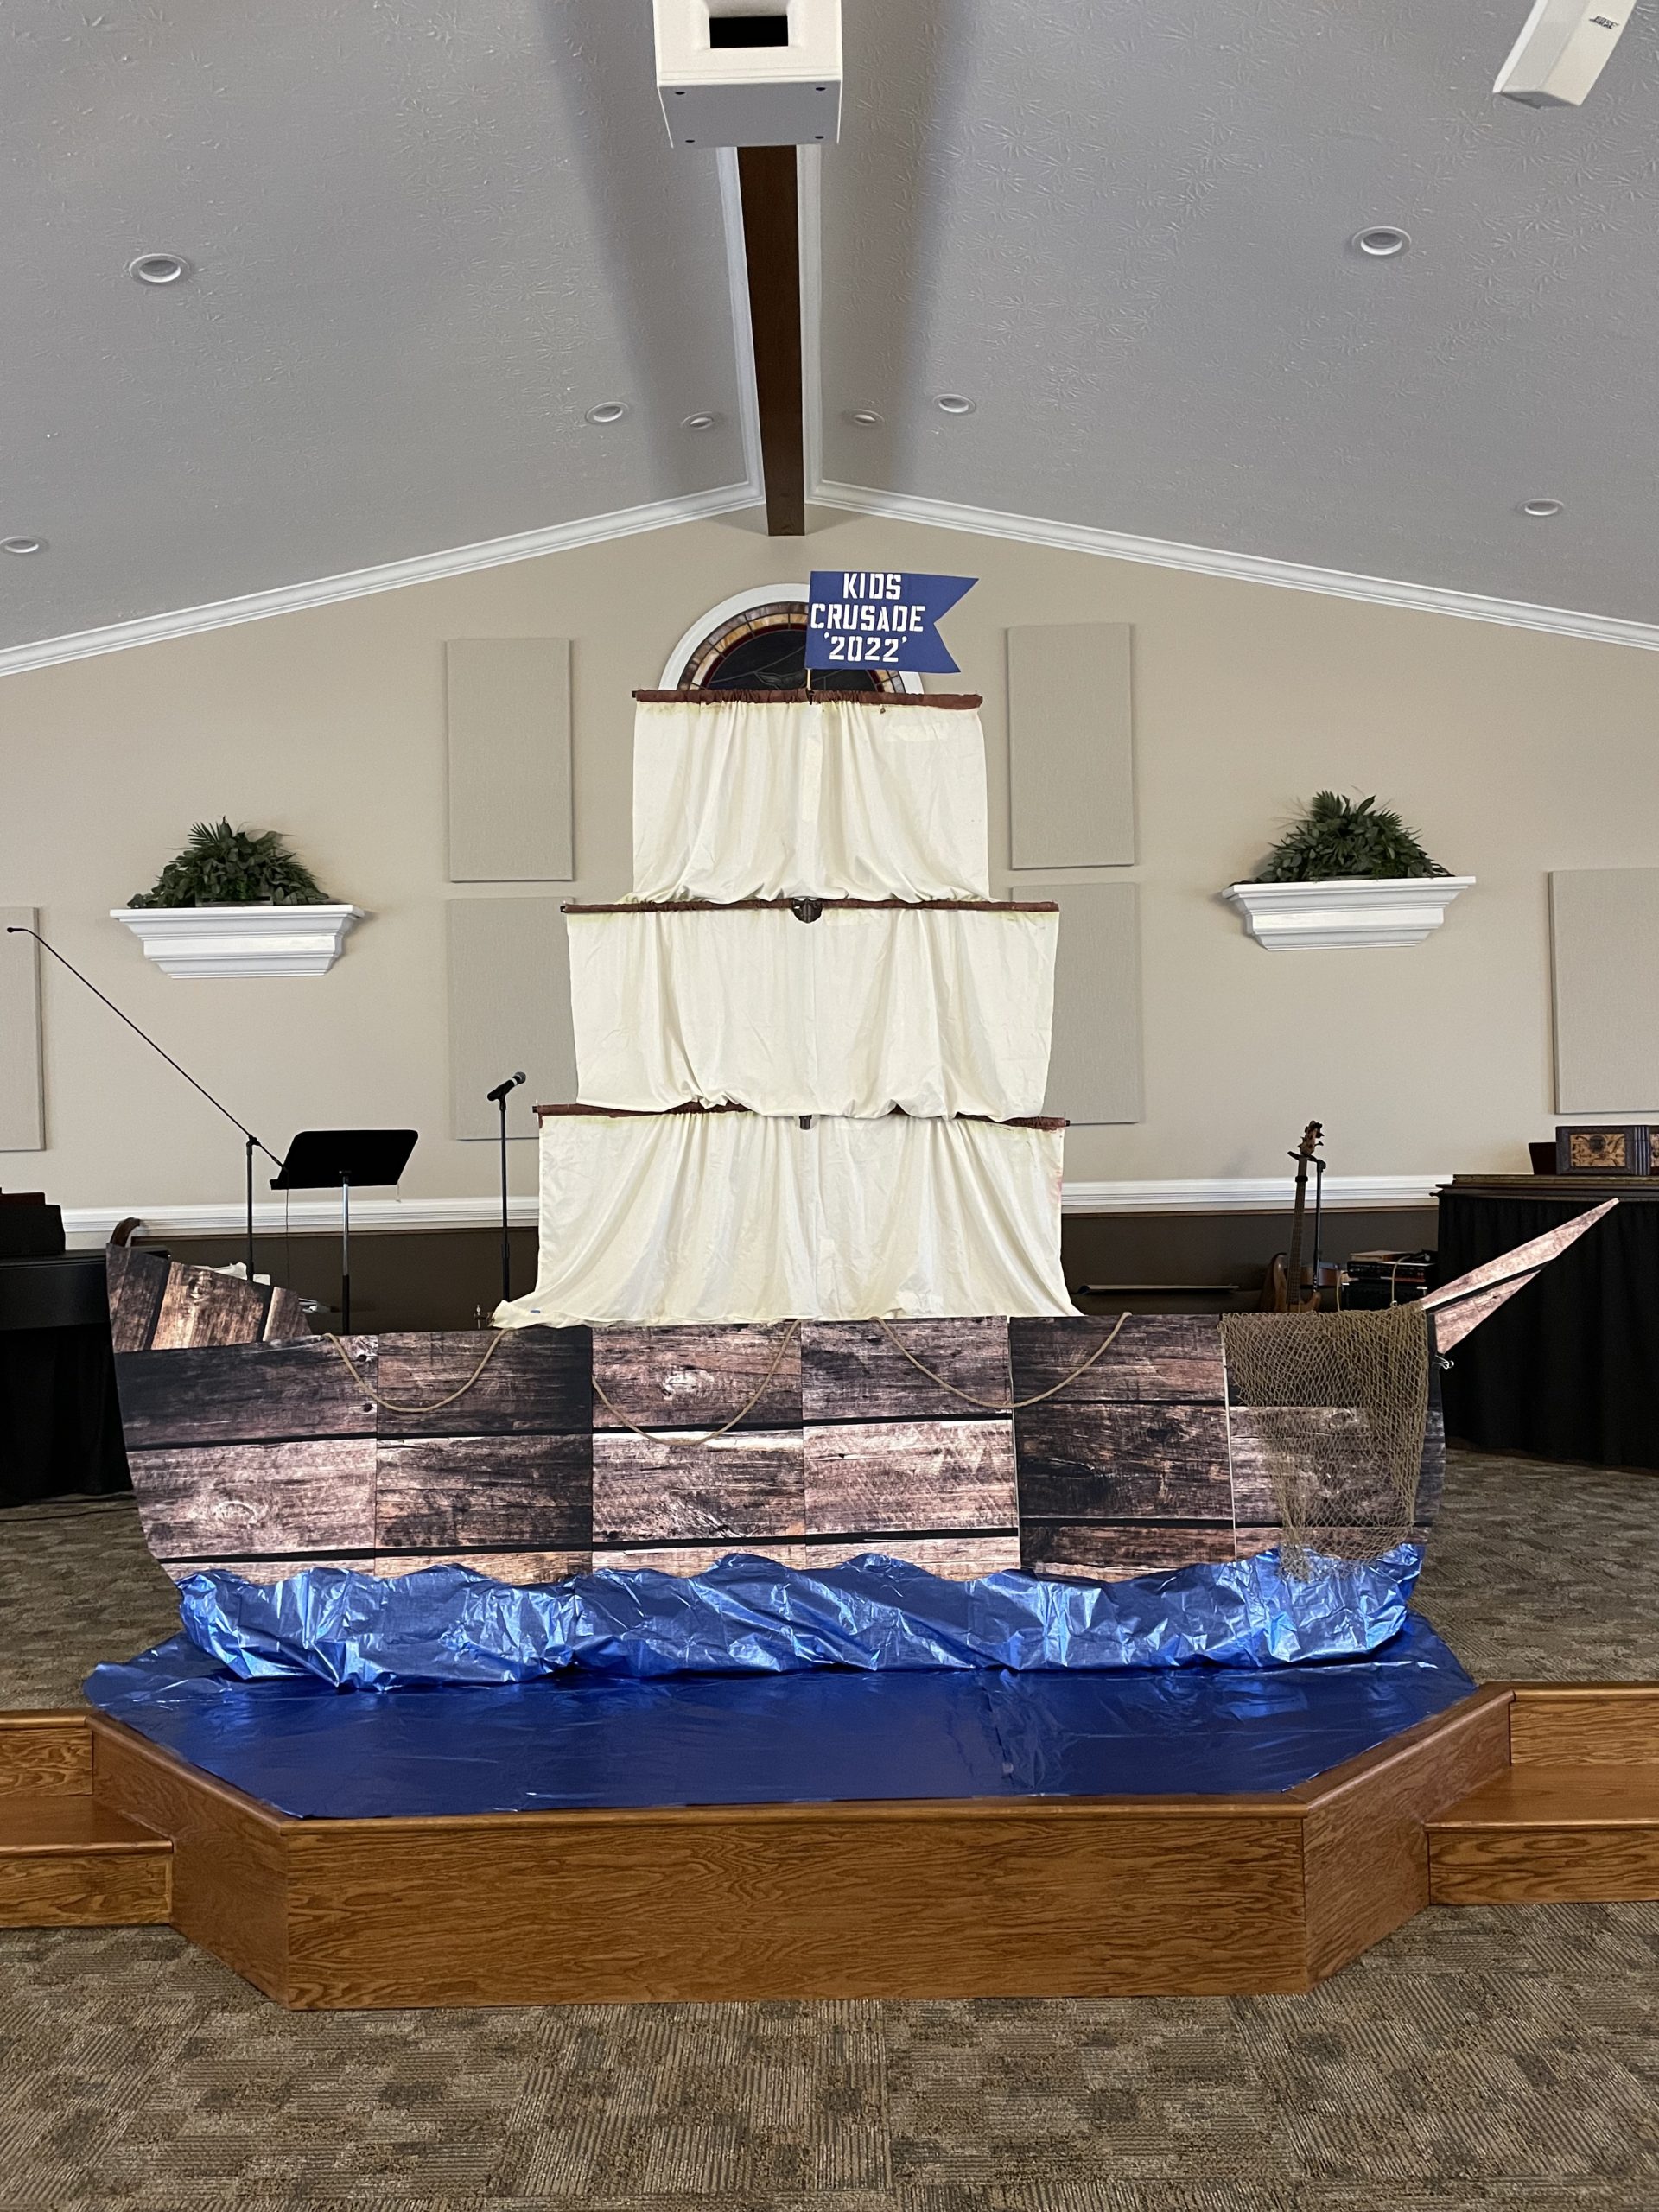
Sister Jenny from our church did a wonderful job building the sail with the help of her husband. It is made of PVC pipe and old bed sheets. It can be lowered or raised to different heights and tears down so small that it will fit into a garbage bag!  It has been a huge blessing and the main vocal point of our set up this year. 

The biggest challenge of making crusade props this year was making them to where they could condense enough to travel. This has taken some organization, consideration, and even some elimination lol. But so far so good! 

My boat is made from dollar tree foam boards duck taped together and covered with a vinyl fabric photo backdrop from Amazon. It can be folded and is very light… almost too light when Skitsters get a little carried away 😂. This has held up incredibly well and I plan to keep this prop making technique close by in the future.  

The Bible skits are one of our favorite parts of the night. We like to take a well known bible story and narrate it while the Skitsters act it out. It’s so fun because they really don’t know the details of how the narrator will tell the story… let’s just say, we don’t always abide by traditional story telling rules… 😂.  

A-mist these kids crusades we have been in several wonderful church services and met many new people. We have also traveled a LOT of miles, particularly during the past six weeks. We did a quick add up and found that we had traveled approximately 3,000 miles in the past 6 weeks! The last two day trip we made coming back to KY consisted of over 900 of these travel miles 🤪. Let’s just say, We have been faithfully using our travel boredom busters and could probably even add a few lol. We have also listened to our 20+ audio dramas for kids plenty, and dug through our emergency car bag one time too many 😂. These three things have been life savers these past 6weeks!  

One thing we majorly lacked and have been working towards is healthier snack options. My kids are extremely picky when it comes to “healthy food” and what I mean by healthy is anything that’s not chips or candy 😂 I’m seriously not too  picky.  

Healthy snack idea! 

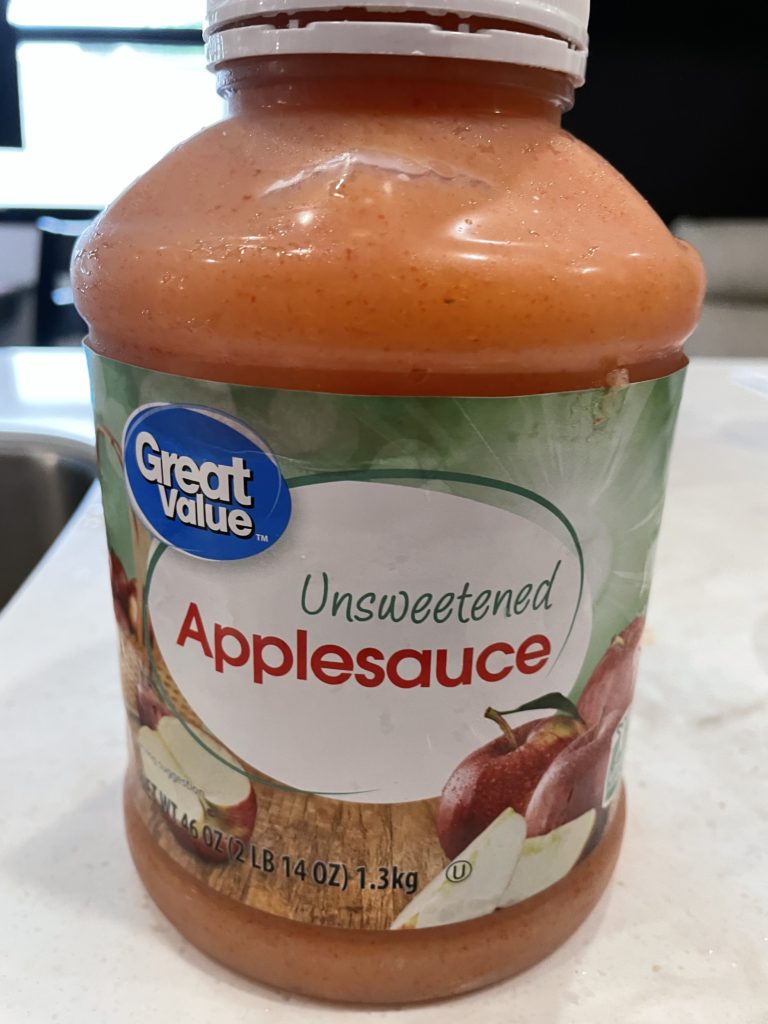
One thing we did find was these snack pouches. I guess I always assumed these were for baby food only until a restaurant served our kids meals with pouch type apple sauce… my brain was turning … no way was I purchasing those expensive disposable apple sauces I had seen in the stores on a regular basis. So I did a quick Google search.. sure enough, as usual, someone had already came up with the genius idea of a reusable food pouch that could be filled, used, and cleaned easily. It wasn’t long before I had a Amazon order in. ❤️ 

Now.. my kids like apple sauce but after awhile, it can get old so I knew I had to get creative. As a child, my Mom would purchase the little cups of strawberry apple sauce. I still remember how it tasted, I absolutely LOVED it!  I checked the stores and sure enough they carried it but… once again,  I wasn’t about to pay for those individually cups. Back to Google I was, the only thing I could find was fruit flavored /added apple sauces. These sound great and are probably the best healthy option but for us, they were not. First of all, my kids would gag if they found even one piece of fruit skin in their apple sauce, secondly it would be a little more pricey then I was looking for and I wasn’t convinced about the shelf life. 

My light bulb moment! 

With my brain still turning I had a light bulb moment!   Sugar FREE Jell-o ! Yes, you heard me right. I played with the ratio a few times and found the perfect mixture to share with you all! By adding a tiny bit of sugar free jello powder, you can have several of flavors of unsweetened apple sauce that your kids will love!  We can’t hardly get past the strawberry although my son also loved the lime flavor. I think we will be trying blueberry next 😊.

I filled our reusable Amazon food pouches with this yummy strawberry apple sauce for our last trip and the kids were so excited! (I even packed me one 😉) 

I do recommend running water through the pouches before tossing them into the dirty sink for quicker cleaning later. You will need a bottle brush of some time for easy washing. 

This apple sauce is so yummy and fun! 

It’s colorful , flavorful, super fast to make, and SO cheap! For less than .50 cent I am able to flavor a entire 2lb 14oz tub of unsweetened apple sauce. Did I mention that It also stores very well? If you’re ready to try our new apple sauce trick, you can have my recipe free under my members only page. If you are a subscriber, head on over here if not, then all you have to do is subscribe by this form below, check your email to confirm, and you will be given the subscribed homemakers page password where you will find special content free to your access! 

Subscribe

YES! I Want to receive post alerts & password protected content as a “Subscribed Homemaker”!

We don’t spam! Read more in our privacy policy

Now what? 

We will be hanging out in KY for a few more days before we head to Alabama. We plan to spend a few days with our family and catch up on doctor visits, etc. after that, we will be jumping into the last half portion of this summer’s kids crusades. That about wraps up this life update. Y’all have a good weekend and don’t forget to check out these related post below. And subscribe to my blog to receive your subscribed homemakers password! 

20+ GOOD audios for kids

My emergency car bag (this is not for normal emergencies ans is a must have for moms!)

reusible food pouches

What are the benefits of giving everything it’s own home?

silicone spatula on a kitchen drawer
Photo by Castorly Stock on Pexels.com

Giving everything it’s own home has so many benefits!

  • Prevents overflow
  • Saves money
  • Simplifies housekeeping
  • Has many flexible benefits
  • Saves time

More on the benefits of giving everything it’s own home…

My friend’s daughter can not stand when her mom asks her to put something in its “home”. She declares that only “PEOPLE have homes, NOT THINGS! “However I, along with her mother, beg to differ! I am a firm believer in giving everything it’s own home.

So, why is it that so many people use the term “home” when referring to items? Probably because of the MANY benefits that come from giving each item a designated place in your house, AKA “home”.

Here are just a few benefits, I myself have discovered by “giving everything it’s own home ”. Yes, I said EVERYTHING!

Giving everything it’s own home can prevent overflow 

When everything has a home, and it’s all put away, you can tell if you actually have room for more possessions. How can we expect ourselves to keep everything put away, if there physically is not enough space for everything to be put away? I mean, let’s be reasonable here! Sometimes (so guilty) we expect too much.

Let’s give ourselves a break! Maybe there really is a legitimate reason I haven’t been able to “keep up” lately. It wouldn’t hurt to take a moment to evaluate and find out! If you don’t have the space to “home” everything you now own, then it is a good sign that maybe you need to rid of a few items and is a great reminder to slow down on the purchasing!

Giving everything it’s own home can save you money!

I often ask myself “where will I home this?”  before making a new purchase. If I cannot think of an available “home”, then I automatically know that I need to rid of something to make room. I don’t know how many times I have walked away empty handed, realizing I didn’t want the ‘new’ item that bad after all.

Giving everything it’s own home simplifies housekeeping

How can we expect ourselves to keep everything put away, if there physically is not enough space for everything to be put away? I mean, let’s be reasonable here! Sometimes, (so guilty) we expect too much of ourselves. Let’s give ourselves a break! Maybe there really is a legitimate reason we haven’t been able to “keep up” lately.

It wouldn’t hurt to take a moment to evaluate and find out!

After giving everything it’s own “home”, you should begin to practice the habit of placing things back in there home after each use. This will super easy, because now, you don’t even have to think about what to do with each item. Thanks to already doing the hard part!

And even if some things do get stranded… that is okay! When you finally  get the chance to pick up, those scattered items can quickly and effortlessly make it back to their “home” and easy to find for their next use.

Giving everything it’s own home has many “flexible” benefits

One thing I love about giving everything it’s own home, is the flexibility of benefits.

For example, when my first child hit the toddler stage, I was constantly putting back each item as he dragged them from their “homes”. I continuously fretted and worried that he would hurt himself or break something.

My first solution was to temporarily place my items up high or out of reach each time I caught him after something. Then I would put them back where they belonged, once he had fell asleep or moved on to “other” things😂 .

One day, my husband suggested that by moving some of these things “permanently”  it would probably make my life a little easier.

(Now why hadn’t I thought of that…..)

After a little bit of consideration, I quickly tucked my pride away, and got on it, re-homing many of my items.

I’m a creature of habit and the homes I had made for each item had became part of setting my routine BUT my husband was right, it was time to MOVE on. (Literally & figuratively)

Over the next little bit, I began to re home item after item, everything from decor, to furniture. And yes, my life got much easier!

Now I can rest assured in knowing that, when my house is picked up and everything is put back in its “home” it is pretty much childproof in this state!

This has became a huge incentive of mine to regularly put things away.

*You can use this same concept to “pet proof” your home or to make it handicap accessible etc.

Giving everything it’s own home is a time saver

Imagine with me, you need your keys, hammer, or ice cream scoop. You’ve spent 5, 10, maybe even 30 minutes searching, all to no avail. Wouldn’t it be so much easier if you instantly knew where your needed item was? Every single time! (Well… almost every time lol) Giving everything it’s own home can do just that!

In Closing

I would love to know if you practice homing items and if so, what benefits have you noticed in your life from it? 

If you enjoyed this post then please like and share!

Also, don’t forget to subscribe via subscribe form for new post announcements, special content and more! 

Related Post

How to quickly clean out my closet

I clean out my closet as a necessity being part of a full time RV family!

full time rv home

Home IS Where You Park It…

I guess I should start out by clarifying that when I say ‘clean out my closet’ I am referring to clothing. Although I do store a few items in my closest besides clothing, I do try to make the main use of my closet for clothes and clothing related items such as shoes, hats, belts, etc.

How to quickly clean out my closet

closet cleaned out
  • Remove excess hangers
  • Remove & store ‘out of season’ items
  • Remove definite “don’t keep” items
  • Remove “don’t wear” items for further examination (more on this below)
  • For each item you choose to keep, shift it to its appropriate place in the closet for quick organization

A closer look at cleaning out my closet

Remove excess hangers

Removing excess hangers is a quick and easy way to clear up some space. You can take them completely out for good or you can add them back in neatly on the side when you’re through.

Remove and store out of season items

Storing out of season clothing items separate from your closet is a great way to free up some space. Be sure to give your storage space a limit and rotate the seasons accordingly. Some great seasonal clothing storage solutions are : A small tote, A shrink storage bag, a square cube bin, or a old zip up bed set bag. Be sure to store the items away from moisture and keep them sealed well. If your entire seasonal storage cannot fit comfortably into your wardrobe, it’s time to downsize!

Remove definite “don’t keep’ items

Definite no keeps are those items that you wonder how they even got in your closet. The shirt you have been meaning to get rid of or the dress that really belongs to your sister. Removing these items is another quick and easy step to clean out your closet.

Remove “don’t wear” items for further examination

Now for the last step to clean out your closet! This step has always seemed a little bit daunting to me and that is why I save if for last. No, not because I’m putting it off but for the exact opposite. I believe getting the super easy steps out of the way clears a lot of space up fast and gives you a boost of motivation, making this last “harder” step seem less overwhelming.

Many post I have read instruct you to rid of all of the items you do not wear without further examination. This is one area I differ on when I clean out my closet.

Before you toss the “I don’t wear” item in the donation bag, I would like you to ask yourself a question.


Why Don’t I Wear This?

The answer to this question can direct you in this last step to clean out your closet.

Here are some common answers you may find yourself with

  • It doesn’t fit anymore
  • I like it hanging up but I don’t like it on me
  • It is uncomfortable
  • It’s sentimental
  • It was given to me
  • I spent a lot of money on it
  • I have others just like it
  • It doesn’t fit my lifestyle
  • I just never get to it
  • I forgot I had it
  • I don’t like to iron

Let’s break it down

It doesn’t fit anymore

We all have those clothing items that just don’t fit anymore right? I’m not going to suggest you get rid of ALL of your too small clothing, nor am I going to suggest you keep it all. Let’s be real here, consider your current situation. Are you in the process of losing weight? Is your situation temporary due to a pregnancy or illness? How “too small” is this particular item? Do you really love this item or do you just love its size?

Asking yourself many of these question can help you recognize the reality of situation better and make a confident decision. It’s good to have a small selection of items for weight loss but don’t go overboard, make yourself a storage limit for these items away from your wearable clothing.

Also, keep in mind that many people like to splurge on a few new items after weight loss. Some even use it as a weight loss incentive, consider if you are one of these type of people when making your decision.


I like it hanging up but I don’t like it on me

So many times my closet has been littered with this exact type of clothing. It looked so cute when I bought it! Maybe I didn’t try it on or maybe your taste has changed. The best solution I have found to deal with these items, is to simply depart from them and be sure to try on clothing before purchasing whenever possible.

*There is no reason to allow a item to clutter your closet if you wont wear it.


It is uncomfortable

When I was a teenager, it didn’t really matter to me how uncomfortable clothing was, if I liked it, i bought it. The difference between now and then is this; then, I actually wore the uncomfortable purchase. Now, it mostly ends up sitting in my closet. If you’re uncomfortable clothing has ended up on your “don’t wear” list, then you are probably in the same stage. It’s hard to break old habits but how about we part with these uncomfortable clothes and STOP PURCHASING THEM in the future.


It’s sentimental

Sentimental items can be hard to deal with. Each person carries their own amount of sentimental feelings. A few things to consider would be…

  • start wearing the item and enjoy it
  • store it in a memory bin
  • make something out of it (there are so many adorable items you can make from old clothing nowadays. (try a Google search)
  • display it (depending on the item, there are shadow boxes etc)


It was given to me

This item probably lands in several of the other “don’t wear” categories because if it didn’t, you would be wearing it. Whether your Grandma bought the wrong size, or your friend purchased her style instead of yours, now you have this item that you feel like you can’t part with. Here are a few suggestions I use when I clean out my closet, hopefully they help!

  • Consider the person before making your decision. Is the buyer more practical or sensitive ? Did they make a sacrifice for this purchase or was it a pass down? Do they notice everything or are they forgetful and care free? Knowing your gifter can help you handle each piece of clothing wisely. You never want to be or even appear to be ungrateful.
  • If you simply do not like the item, try it on with several different items before you completely decide against the piece. It may end up being the perfect match to something after all.
  • If you still do not like the item, try wearing it a few times around the giver or take some cute pics in the outfit to send to them to show your appreciation. Then after you have gotten some use from the item and some time has passed re visit the item. You may find you like it after all or you may decide to part with it. Sacrificing your feelings can be a great part of being thankful.
  • The last tip I have here is to be honest. This relates to the wrong size not if you don’t like the item. If someone tells you they have the receipt if you need to exchange, take the liberty to kindly tell them the item does not fit. Be sure to TRY IT ON first, to show your sincerity. Most buyers would much rather you return the item for the correct size than for their purchase to not be used. This also lets them know your correct sizing for future purchases.


I spent a lot of money on it

Spending a lot of money on a item that you no longer wear can cause a lot of guilt. What you must realize is, that holding onto the useless item does not make the situation better but only worse. My advise here is to simply let the item go and remember how you felt when purchasing new items. Allow this to teach you to be very specific in your spending choices.


I have others just like it

Having too many of a type of clothing can result in overlooked pieces. This is a great opportunity to donate! Figure up how many of this type of clothing you need between your wash cycle and toss the rest.


It doesn’t fit my lifestyle

Do you have 5 exercise shirts but never exercise? Maybe you have a wardrobe full of T-shirts that you only wear on the weekend. Realizing what you wear and how much you wear it can really tell you what categories of clothing you need most . Don’t hoard clothing you don’t wear.


I just never get to it
OR I forgot I had it

Anytime I have clothing that lands in this category, I count it a great opportunity to clean out my closet some more. I mean think about it, you won’t even miss these items when they are gone!

I don’t want to iron it

Hopefully, I am not the only one that by passes a outfit due to its need of ironing 😂. No joke, I have enough ironing to do with 2 “men” in the house, I figure why buy clothing that needs constant ironing for myself when ladies clothing have so many iron free options. If you are like me, i recommend passing that wrinkly shirt on and doing the wrinkle test next time you shop!

For each item you choose to keep, shift it to its appropriate place in the closet for quick organization

This is a quick organization tip. Organize while you declutter and declutter while you organize! They should go hand in hand.

After!

If you have enjoyed this post, please like subscribe and share below!

Also check out my related post here!

A simple toy room

The benefit of homing items

Small space child saftey products

A simple hand me down clothing system

Laundry stain remover

Travel Snacking

Oh, and what about the mess ? ????

“2021” has held a lot of life changes for my family. One of those changes have included much added travel!

Here are a few child (and some adult) travel tips I’ve quickly learned over the past 5 months.

So far, one of my biggest mess reducing tips for travel, starts before the trip begins! That would be to…

#1

Prepare your car before each trip!

If you don’t have time for a deep car clean, at least, empty out any unnecessary items, dump all trash, and if possible, do a quick rug shake & spot vacuum.

Starting with a clean slate (or car ????) sets you “on the road for success” ????

#2

Pack walmart bags or a small can for trash containment between stops.

#3

Have a plan to contain travel toys. An example would be a toy bag/ back pack for each child or a fabric bin in the middle seat. (Personally, I just use the front seat pockets)

(See my Dollar Tree book light (batterie included ????), I have these hooked on seats for nighttime travel, they are bright enough for the kids or me to see but not blinding to driver!)

#4

This is not a a visual clean up tip, but I do recommend keeping a seat protector under child car seats. This is a great way to protect vehicle seats from potty accidents and snack stains .

It also makes clean up at the end of trip so much easier.

When your trip is over, you simply shake out waterproof cloth and wash, if needed.

(This is not a travel only tip, I use fabric liners @ all times for easier car maintenance)

You can purchase custom made seat liners from places like Walmart or Amazon.com. I, myself, prefer these ‘all purpose’ water proof liners from the Wallmart baby department.

They are cheap and work amazing. I fold mine in half and tuck the extra fabric tightly underneath seats, like these below.

http://www.walmart.com/ip/Waterproof-Portable-Crib-Pads-2-Pack/5446849

These are also great for sparing sheets during potty training or to help with diaper leak problems, I even used them to sponge bath my newborns on my own bed!).

The fabric is so soft, machine washable, yet still water proof inside. Perfect for so many uses.

#5

My last tip for travel mess control leads into snack tips and that would be to make use of your stops.

A few things I recommend including at each and every road stop are:

A trash dump

( it only takes a minute to dump your trash bag or can. And look for any other trash laying around)

A quick car pick up (toys in bin etc)

(Again, this only takes a minute! Get your kids involved in these “road stop activities”. You will feel so much better when you start back out.

– This is also a great time to wash out

any used cups & refill all drinks.

Retrieve any items wanted from cooler.

Fill gas tank (yes, we like to make a nice gas station or truck stop our stopping grounds, this allows my husband to fill the tank while I work on other things. Killing 2 (or line 5) birds with one stone!

Eat or prepare lunch for the road, if

needed.

——————————————————

– Packing Snacks –

There are 3x things I use in packing travel foods. Snack bags, thermal lunch box, and thermoses.

#1 snack bag(s)

With my children so young I usually pack one good size “snack bag” wich is a reusable grocery bag, containing many options of my family’s favorite snacks.

Many of these are proportioned into single serving sandwiches bags.

I also store some of the healthier (unlimited options) in quart size baggies to pass out at will.

In this “snack bag” I bring 2x plastic cups wich is what my children eat snacks from.

Anytime they are hungry, I prepare a mixture of snacks in a cup and pass back.

Why a cup?

The cup is easy for my little ones to hold onto.

It also encourages them to set it in the cup holder verses dumping the sandwich bags in the floor between each bite & playtime.

Lastly I don’t have to worry about my one year old eating the plastic baggies behind my back !

When snack time is done, the cups can be disposed into trash bin, or as I prefer, handed back to me and kept for the next snack time .

Another snack bag option for older kids or adults would be to pack small individual snack bags, each containing that person’s personal snack faves for the trip. Brown paper bags, or individual lunch boxes would work great for this.

Ideally, each person would keep their snacks by them with their personal items.

#2 Thermal lunch bag or cooler

I always include a way to pack items like sandwiches or cooled bottles of water.

If you don’t have a lot of space for a cooler in your trunk, consider picking up or borrowing a simple lunch box. They make them in many sizes and styles now days, adaptable to many needs.

Even if you wish to eat out , It’s much cheaper and even a time saver to at least pack your own drinks than to purchase them at every gas station. (The same goes for meals or snacks) plus, it’s a time saver to have everything already by on hand!

#3 Thermal cups & thermoses

Lastly as you may recall from last “Tuesday’s Tidbit”, I LOVE to use thermoses!

You can use them to keep fruit or veggie snacks extra cold.

I also love my pourable thermos to refill milk for my “baby” at nap time.

And don’t forget your favorite thermal cup! (You know, the one that fits in your cup holder and keeps that drink

SO COLD!)

———————————————————

– The potty problem –

Maybe potty breaks isn’t really part of the “snack or mess” category of traveling, but let’s face it … it’s definitely pretty close to both.

It’s the result of one, (the snacks) and one step from the other (accidents happen!) ???? either way here’s my 3x potty tips!

# 1 Limit drinking

Let’s make this straight, I do not encourage dehydrating your children!

But, if your child is a huge drinker (like mine) then cutting back drink amounts a tad, for just a few hours won’t hurt a bit.

A good rule of thumb I have used is to “never deny your child a drink when thirsty, but give them a sip or two instead of an entire cup to gulp down at once.”

This makes sure they are only drinking when they are truly thirsty and not

‘just because”.

Don’t think this idea is only for kids! I limit my own fluid intake on trips, and yes, I notice a huge difference in potty breaks!

#2 Ditch the water

Ok so this tip could be very controversial. I usually would encourage water drinking by %100 percent! I’ve always wanted to be a water lover and I’m trying my best to instill in my children to drink it daily .

But.. travel days is my exception. Yes, we drink some water but here lately, I’ve been trying to stay more with milk, juice, and diet drinks. They dont seem to run through everyone’s bladders near as quickly. Wich means less emergency bathroom & diaper stops!

#3 Plan for stops

Let’s face it , when traveling with kids, and even some adults. You really need to stop every little bit. Don’t kill yourself trying to make it as far as you can, instead try planning for a few stops in your travel time.

The key here is to make true use of each of those stops!

As mentioned before, if you will take the time at these planned stops, to cover everything, you will be more apt to skip emergency stops ahead.

Each time you need to make a stop be sure everyone goes potty!!

Also, don’t forget to change all diapers. You will be so glad you did 30 min down the road when you’re able to drive on past that rest stop!

I realize everyone’s needs and travels look different. I am just using my experience to show you how making use of your planned stops can benefit you and even prevent explosive diapers ????. Seriously, I’ve learned the hard way, know matter if it’s just a little wet, go ahead and change it while stopped ! If you don’t, by the time everyone needs to stop next time, may be to late. Lol

If you enjoyed this article please

Like ❤️Subscribe ❤️Share

Thanks for reading!

-A Simpler Life-


Links:

Crib pads (used under car seats)

http://www.walmart.com/ip/Waterproof-Portable-Crib-Pads-2-Pack/5446849

Healthy To-Go Snack Hack

Is that even possible?!

I’ll haft-a admit, traveling a lot has been a serious challenge to my ‘very slow’ postpartum weight loss plan.

Since I was a little girl, I’ve always loved long road trips. There was just something exciting about seeing new sights, playing road games, listening to stories and snacking on, well… everything really. ????

To me, road trips were a fun excuse to splurge and that was perfectly fine when traveling only a handful of times per year.

But now, traveling every 1-2 weeks regularly, I knew I must find a new action plan.

Some people can travel and not snack at all, I tried that and it wasn’t for me.

My next solution was to pack several healthy snack options along with a couple ‘single portions’ of splurge snacks.

Unfortunately, I do not like too many healthy snacks but one thing I do love is cantaloupe.

That’s when I remembered seeing a YouTuber use thermoses for her children’s hot school lunches such as quesadillas etc.

If she could break the soup & hot cocoa thermos tradition, why couldn’t I?

As we prepared for our next road trip, I pulled out this tiny child size thermos my son received as a gift. I filled it with my diced fruit, grabbed a plastic fork, and Wa-La! I had cooled (very delicious) cantaloupe on the road!

The next time, our trip was a little longer, so I filled my large thermos with half of an entire cantaloupe. (And yes I ate it all!) but just imagine all of the junk food it replaced!

If you have never tried fruit in a thermos, I’m recommending it!

It’s a great way to pack a healthy snack or side to work, school , in your diaper bag, or yes, even for travel ????.

What untraditional items do you use your thermos for?

Feel free to share in comments below!

If you enjoyed this tid-bit post then don’t forget to

like ❤️subscribe ❤️share

And keep watching for more travel tips in the near future!

5x Simple Tips to STAY WARM In your RV this winter!

This being our first winter experiencing FULL TIME RV living, I’ll have to admit, I was pleasantly surprised to see how well propane has actually heated our fifth wheel. BUT…wow! ???? Propane can really make it’s mark on your wallet!

After noticing how fast we were burning through our 2x 30gal propane tanks, me and my family quickly began searching for ways to stretch this gas like gold, And Still Stay Cozy.

With a little brain power and the help of some friends & the internet, here are a few things we came up with!

1. Don’t Forget To Close Your Bathroom Vent/Fan Cover!

More than once I’ve walked in our tiny bathroom to realize the bathroom vent/fan has been open and on for who knows how long . I realize the importance of this vent, and that it’s often used to remove humidity from your RV during the winter months. But, If you’re like me and often forget to close it, you might consider turning the fan off and closing the vent whenever your finished up in the bathroom. And If that don’t work, try setting a timer on your phone to remind you to close it as soon as needed. You don’t want your precious heat unknowingly slipping outside, hours at a time!

2. Sleep Sacks & PJ’s

Any trouble with your little one kicking off the blankets at night? I found this second hand, homemade, sleep sack to be a great solution for my one year old! She has been using it since she was about 6mo old. Personally I would prefer to have a sleep sack made with sleeves to add even more warmth over her gown/shirt sleeves. But this one will do for now. For my 3yr old, The old fashion, one piece, fleece jammies are a great solution!

Add socks under these one piece, footed PJ’s for extra warmth.

3. Cover Your Floor Heat Vents

Living in a fifth wheel, the upper part of the camper always seems to hold so much more heat.

To balance this Temperature difference, I purchased a pack of 2 magnetic floor vent covers for 3.97 at our local wal-mart. I trimmed one to cover part of my upstairs bedroom vent. ✂️

This trick is often used in residential homes. It distributes part, or all of the rooms heat to the rest of the house. (In our case it pushed the heat down to the main living area of the fifth wheel)

The upstairs quickly felt more balanced with the downstairs temperature, and the downstairs was receiving the extra heat flow It needed. You may need to adjust how much of the floor vent you cover for a couple nights to find the happy medium before trimming your vent cover. (The more of the vent you cover the more heat will be pushed out of the room, and less heat will be left in the current room or area)

If the room becomes to cold, uncover more of the vent. If it’s still to warm, cover more. ☺️ (I started out with about half covered, now I only leave about 1-2in uncovered)

4. Use Electric Heaters!

This by far, has got to be my BEST tip.

Yes, it’s probably the most common and the most obvious. But, NEVER overlook the obvious! Depending on the size of your camper, you could possibly run more than one electric heater without throwing a breaker! Our RV handy man suggested trying it out like this, place one small heater on each end of the RV and leave the middle empty, to better your chance of not throwing the breakers.

You could also check your manual for Amp limit info, or you could do like me and just try your hearers in the different outlets until you see what works ????‍♀️ In our 42ft fifth wheel, I’ve found that I can run one mini-heater in my mid-bunk kids room and a second in the living room, along with the built-in fireplace heater in the main living area! This works out great since our bedroom seems to hold a lot of heat and doesn’t need a heater anyway.

You wouldn’t believe the difference this has made! This week has been single digit temperatures and we have stayed warm while still lengthening the use of our propane. No, I do not have statistic charts to compare the propane use of before and afterwards for you (I wish I did!)

But either way, I can confidently say that it has made a obvious difference in our home . So, first of all, if you have a built in fireplace, put that baby to use! And If you think it helps any, then jump to it and add a little heater (or two)! If you have been looking for a extra heat boost, It’s at least worth a try!❄️

5. House Shoes?

Now that we got the air nice and toasty, I know your just dying to ask … “Is the floor still cold?” Well, actually yes. Let’s face it. It’s a camper. It’s not insulated like a house. When the wind blows it’s still drafty, and YES the floors stay cold. (especially if you don’t have carpet!)

When we first moved into our fifth wheel my husband Mark declared house shoes were not for him, ever. A month or so into winter he quickly changed his mind! Matter of fact, this Family has become proud owners (And wearers) of house shoes all around! As silly as it may sound, they really do make a difference! If your hibernating in a camper full time or temporary this winter, don’t hesitate to pick up a pair. They are worth the money ????!

I hope these tips help you in someway!

No, I’m not a professional but hopefully something I share out of my learning experience will help simplify someone else’s RV experiece. ❤️

Hope this article helps!

If you enjoyed this post then Please

LIKE and SUBSCRIBE! ❤️ New post will be added each week!